Search
Latest Articles
Bobber Down: Part 1
by Hannah Pennebaker , September 06, 2020
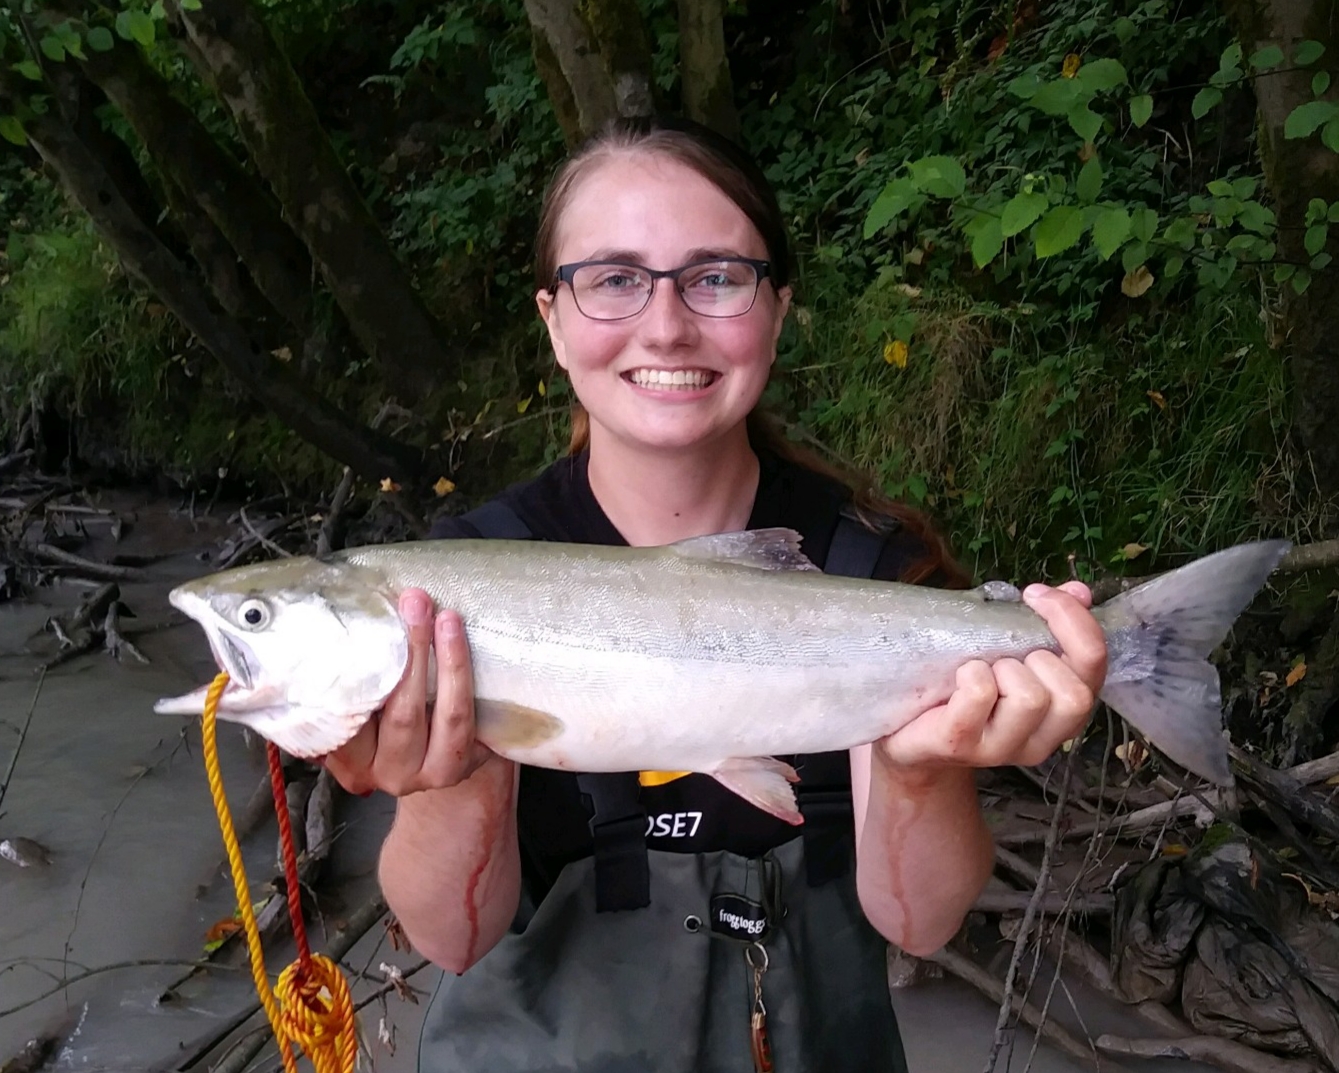
It's that time of year again. Hundreds of fishermen line the shores of Western Washington rivers, casting over and over again in hopes of catching a Pacific Northwest treasure: salmon. Most of these anglers will be using a corky and yarn drift setup: 4-8 feet of leader, a "pencil lead" weight, and a small corky pegged on the hook and finished off with a piece of yarn tied close to the hook. Hundreds of salmon will be caught on this rig every year, and it is tried and true. However, there is another method you can try, if the fish just aren't biting your corky, the current is too slow, or you just want something to do with all those salmon eggs. Floating a bobber and eggs is my favorite way to catch fish in any river. Instead of feeling the weight ticking on the bottom and waiting for a tug, you'll watch your bobber and wait for it to go down. There are few fishing moments more exciting than watching a big king sink your bobber down! There is some technique involved but once you learn, you'll be having bobber downs on your own in no time.

Egg Cures
In order to fish with bobber and eggs, you'll first need to procure some salmon eggs. Outdoor stores in the area sell pre-cured eggs. These are just fine for starting out with, but eventually you'll go down the rabbit hole of curing your own eggs. There are as many egg cures as there are fishermen. Some use commercial cures, others brew up their own. Many are well guarded secrets. Here is a tip to start you off: the best cured eggs start with good quality eggs.
You've caught a nice salmon on the river. The belly feels full of eggs! The first step to making great cured eggs is to get those fresh eggs wrapped up and on ice right away. Bleed your fish by making an incision in the gills, and then gently remove the eggs. Never let the eggs touch the river water, or the ice. Never rinse them. Salmon eggs react with water right away; the walls of the egg break down to allow easier fertilization. Once you've got your iced eggs home, gently unwrap them and lay them out on newspaper or paper towels. You'll want nice, dry skeins. If the skeins are large, butterfly them with a fillet knife and open them up. Eggs from jacks and pinks are usually okay to leave whole. If there is blood in the veins of the egg skeins, take a spoon and push the blood out. Pat the skeins dry again. Salmon do not like the scent of salmon blood.
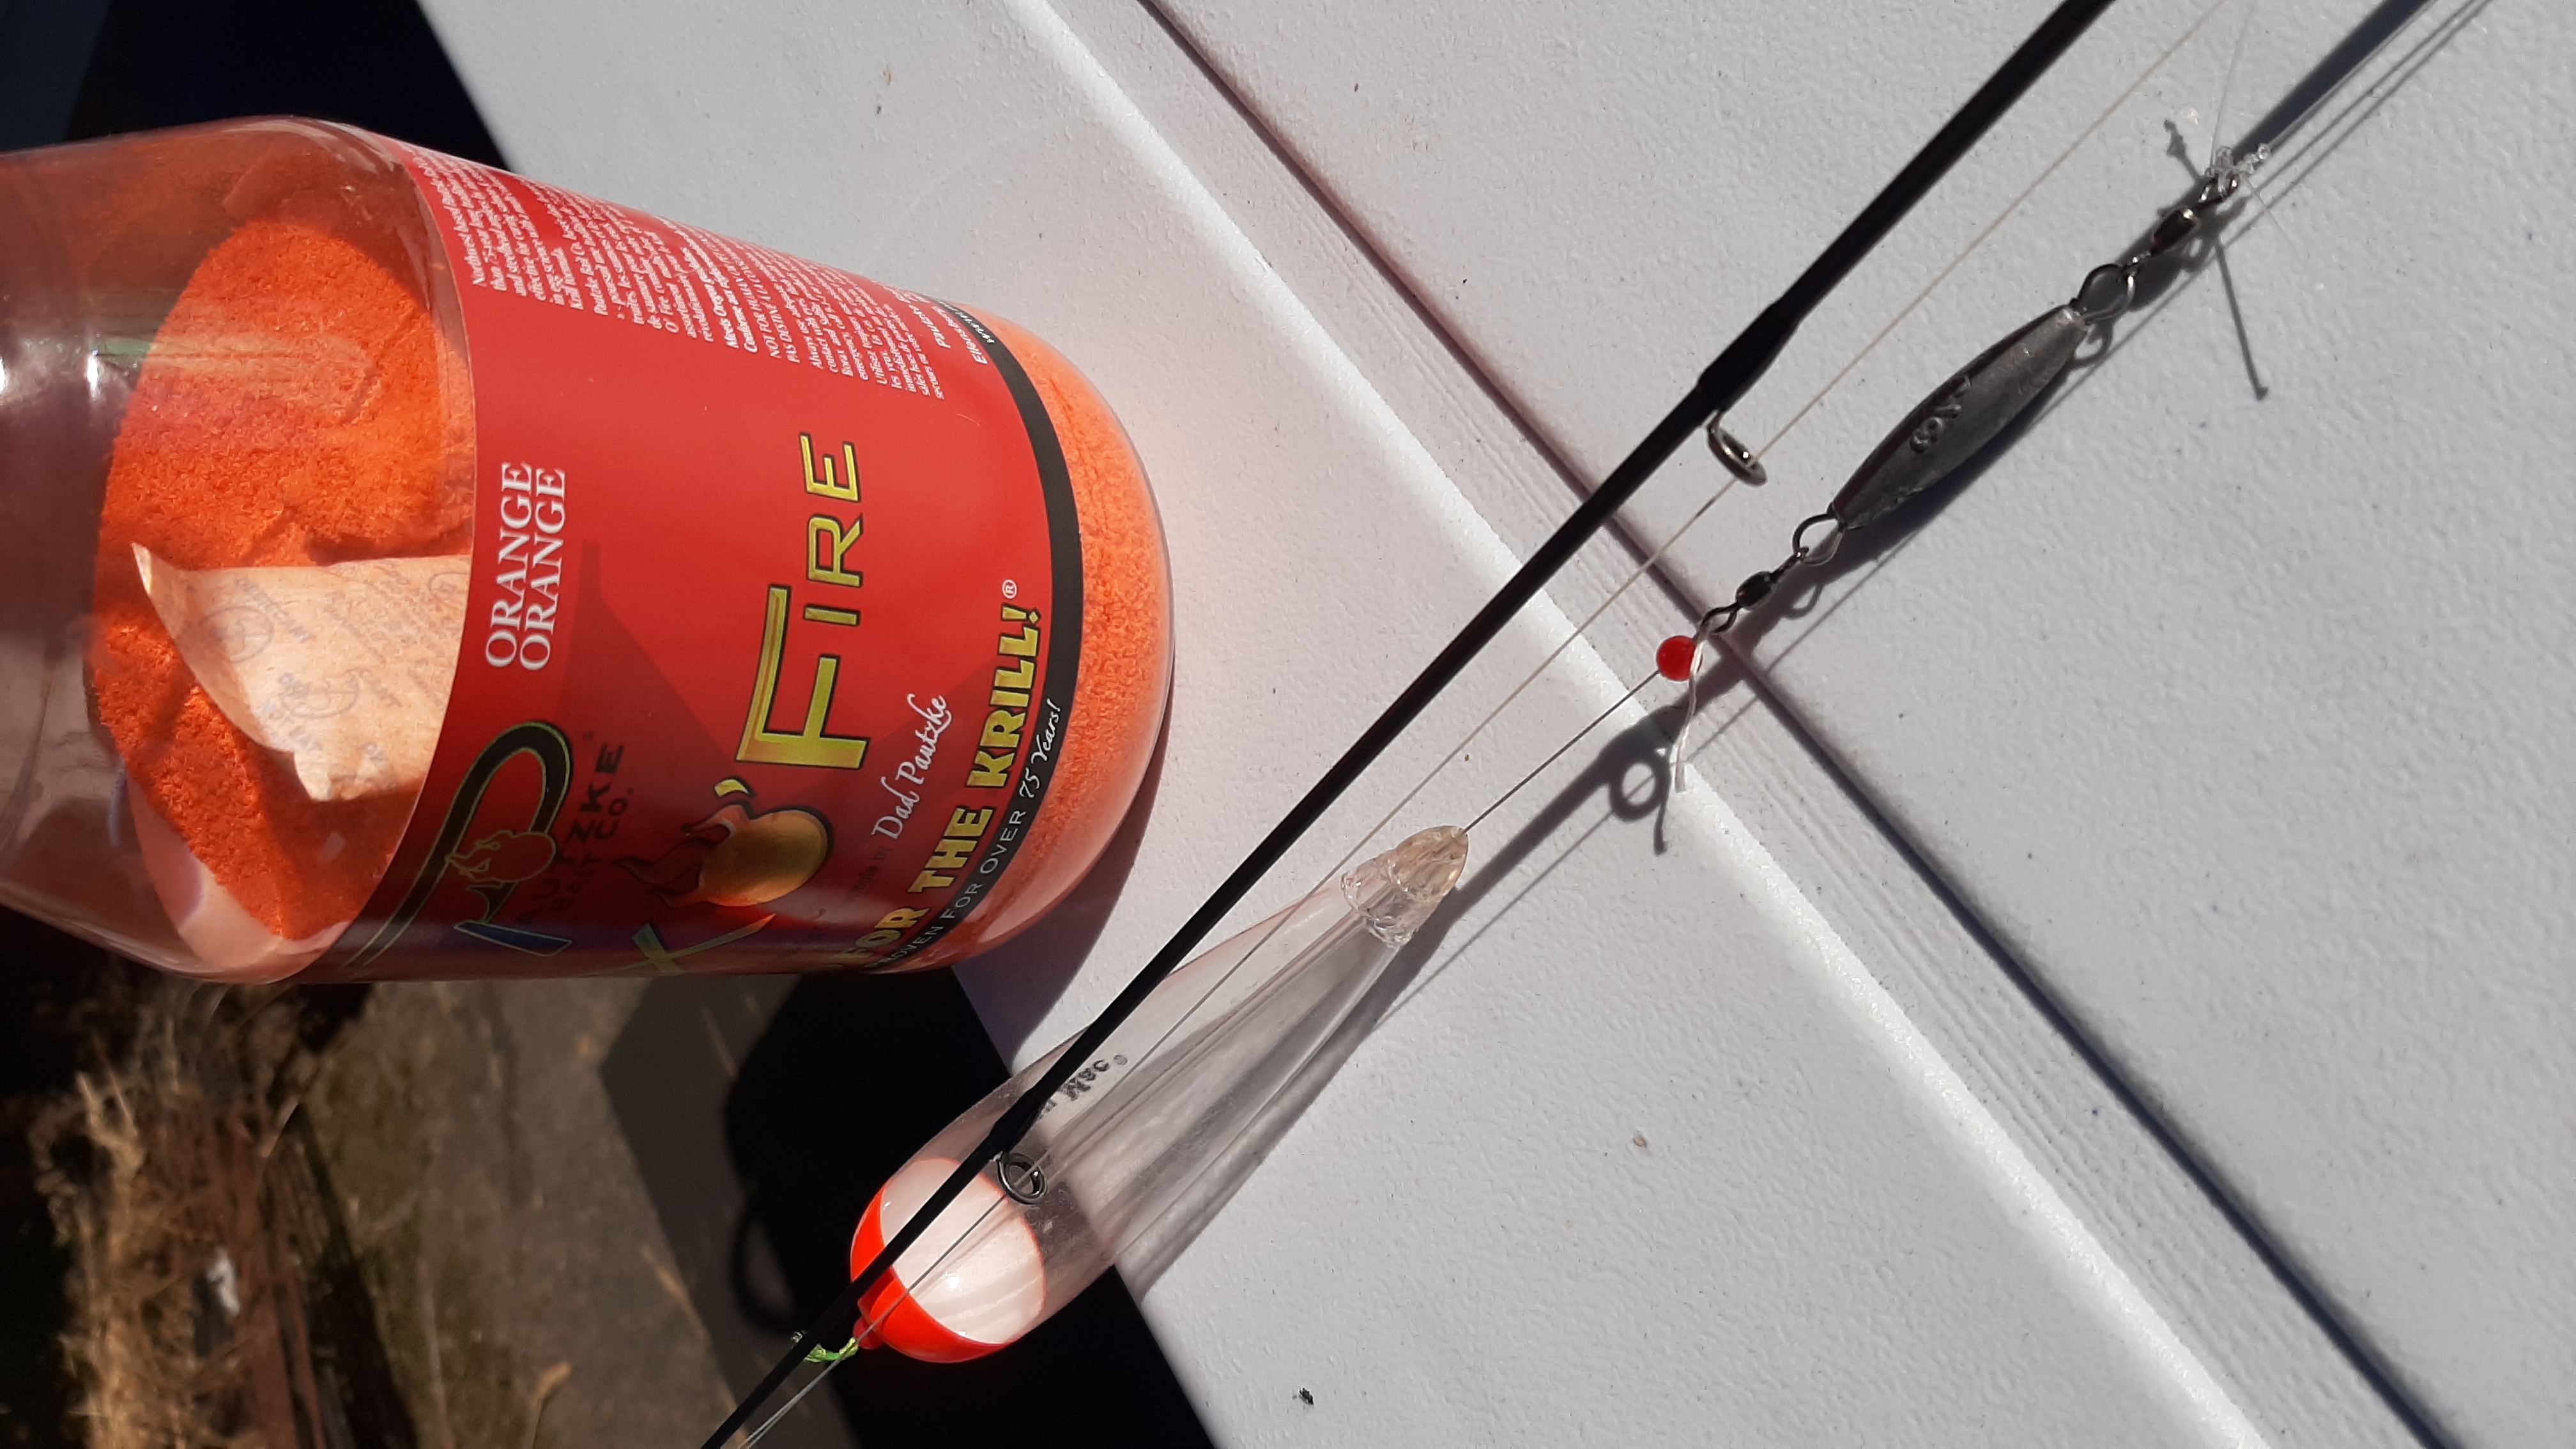
Once the eggs are dry and bleed, it's time to start curing them. Follow the instructions on your chosen egg cure, and place them in glass jars. I usually label my jars with the species, color, cure type, and date. Cure for several days and then freeze for future trips. Pautzke, Atlas Mike, and Pro Cure all made convenient and useful ready made cures, in a variety of scents and colors. Alternatively, you can use your own home made cure. A versatile and easy cure that gets good results is called the 3 2 1 cure. It's 3 parts Borax, 2 parts white sugar, and 1 part uniodized salt. Mix the cure together and sprinkle on your eggs. Gently massage it in. Don't use too much cure or the eggs can get chemical burns. Sprinkle like you're seasoning a steak. Let your eggs cure for 24 hours. You'll see the eggs start to "juice" as the moisture begins to be expelled. This is the time to add in scent and color. You can add krill powder, tuna oil, or herring scent. For color, you can use kool aid powder! I recommend trying a variety of scents and colors so you can key into what the fish want that day. Tumble the eggs in the jar and cure for another 2 days before using or freezing for later. This is a good cure to get you started, but don't be afraid to try new ones. What the fish want can vary from river to river, year by year, day by day.
Rod and Reel
Now you've got your eggs curing in the fridge and you're wondering what rod and reel to use to float them. My favorite is a 10'6 Okuma Guide Select, 1/4 to 1 oz rated. You'll want that extra length to help you manage and mend your line while you're fishing. Anything between 9'6 and 12 feet will do the job. Okuma SST's, Daiwa Acculites, and Lamiglas Redlines are all great choices as well. You want a rod with strong, well made guides and plenty of backbone for good hook sets; salmon have hard mouths. I recommend a foam or carbon fiber grip. Cork grips tend to absorb the dye from your egg cure and turn pink!
As for your reel, pick something in the 3000 to 4000 size. Egg cure can and will get on your reel, so be prepared to wash off your reel after every venture. The salt in cures is detrimental to the long term health of your reels. I use a Daiwa BG; these are workhorse reels that can take a beating and a little salt exposure. Penn Pursuits are heavy but also very reliable. You can also use baitcasting reels for floating eggs. Abu Garcia make great entry level reels for this, as do Daiwa and Okuma.
Terminal Tackle
Now that you've got your rod and reel, it's time to rig it up. I recommend 40-50 pound braid on your main line. Grab a 1/2 oz or 5/8oz bobber, a large, bright colored corky, a strong barrel swivel, some small beads, and a bobber stopper. On your main line, thread on a corky, bobber stopper, bobber, bead, and weight. Use 1/4oz lighter than your bobber is rated for, to account for the weight of the eggs. The corky is there as an extra visual indicator as well as to show you if your eggs are hanging up on the bottom. There are several different kinds of bobber stoppers. There are rubber ones that work quite well, but I prefer the traditional thread ones. These come on a small black tube; thread the tube onto your line, pull the stopper off the tube and onto your line, and pull the ends of the stopper tight. Discard the black tube, and trim the ends of your bobber stopper. Tie on your swivel, then 3 feet of your chosen leader line. I recommend 20 pound fluorocarbon. Tie an egg loop to your hook. This knot has a bit of a learning curve, but there are many video tutorials online. Hook your eggs securely through the skein. Open up the loop on the knot and slip your eggs in. Gently tighten the loop to hold your eggs in place. Now you're ready for some bobber downs!
Now you've learned how to care for fresh eggs, how to cure them, what rod and reel to use, and what terminal tackle you need. Stay tuned for next month to learn how to identify good water for floating bobber eggs, how to mend your line, what a bobber down looks like, and how to set the hook. The rules are the same as for drift fishing: remember to use only one hook, pinch your barbs, and follow the retention rules of the river you're fishing. Using your own home cured eggs is one of the most satisfying ways to catch salmon. Most importantly, don't take your eyes off the bobber!
Hannah Pennebaker graduated from Pacific Lutheran University with a degree in Environmental Studies. She enjoys both freshwater and saltwater fishing adventures in the Puget Sound area with her fishing group, the Straw Hat Fishermen.