Uniflite Salty Pup Refit

Talk about your boats, trailers, and boating specific topics here. Sponsored by Life Proof Boats.
User avatar
Gisteppo
Commodore
Posts: 1016
Joined: Fri Jun 22, 2007 11:26 am
Location: Lake Spokane (Long)
Contact:

Re: Uniflite Salty Pup Refit

Post by Gisteppo » Sun Apr 21, 2013 7:24 pm

I really like having a kid, but man compared to the old days, this stuff takes forever. Used to put in 40hrs+ a week on the boat outside of work, now I'm lucky to get 8 hours in a week or two.

The move has gone to more rigging work than construction stuff. Made a mid-stream change to the layout plan based on where the engine is looking to fall in the LOA of the boat and for an alignment of ballast/access hatches.

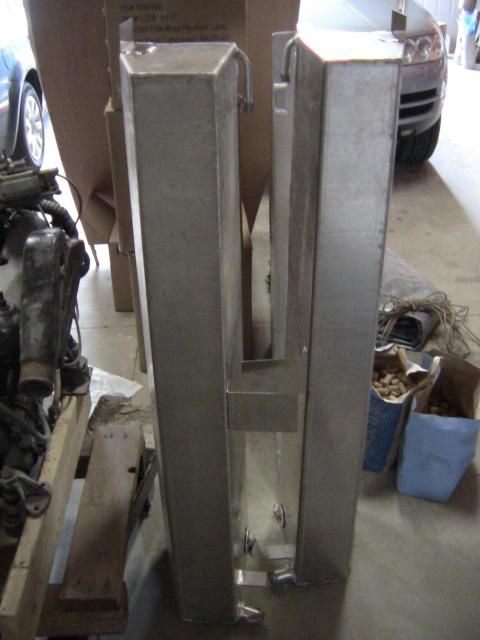
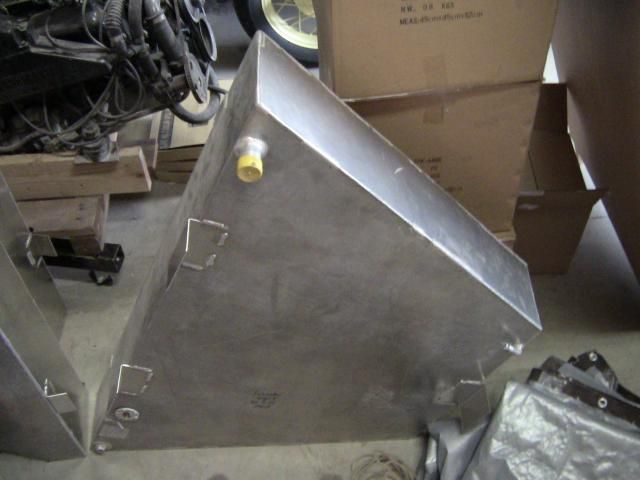
Had my buddies at the aluminum shop add some mounting tabs in various places on the tanks. 5 per tank on the saddles, and 3 huge ones on the bow tank. Anyone recommend a good tank bearing? I don't like the idea of the tank rubbing on fiberglass or wood. Was thinking neoprene or HDPE.

Image

Image

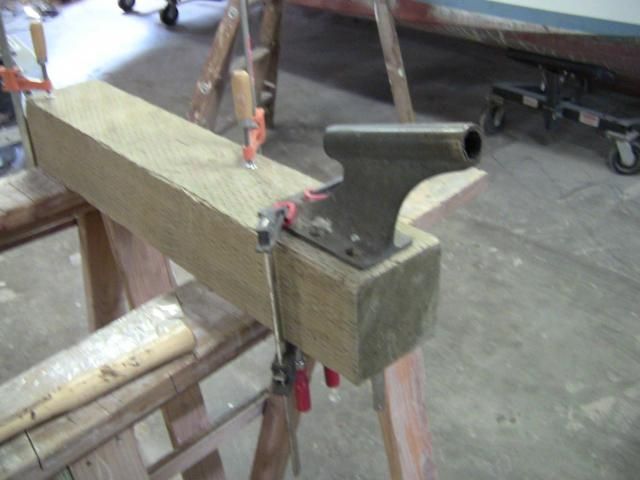
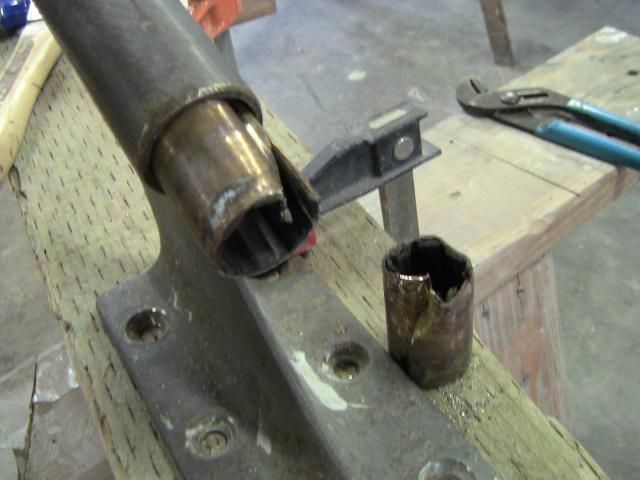
So the internet is pretty convenient. I did what I found a few places recommended and used the hacksaw method of replacing the cutlass bearings. First you score the bearing, cutting it through the metal as cleanly as possible without cutting the strut itself:

Image

Bend a little hooey in it so you can get some pliers on it:

Image

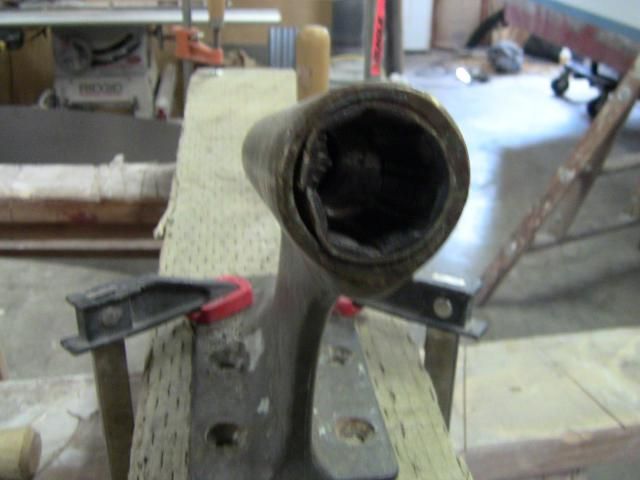
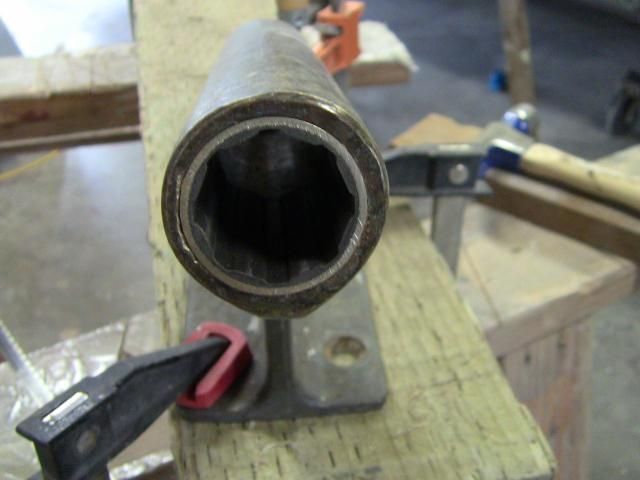
A little pulling and tapping:

Image

Then drive the new ones in:

Image

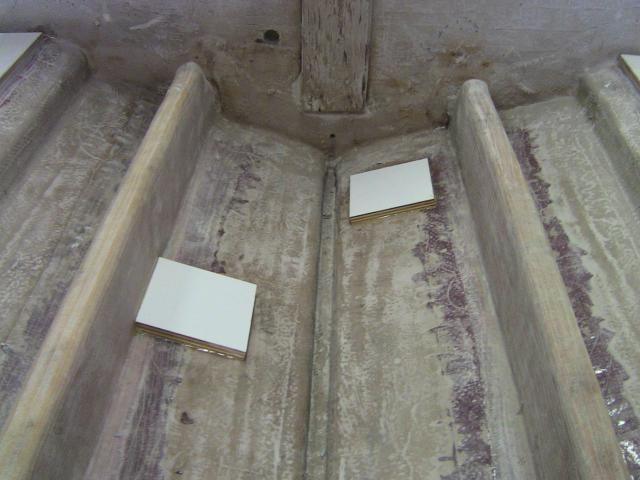
Made some backing plates for the two 1-1/4" seacocks. The odd placement is because there were two existing holes in the hull, and it seemed ridiculous to me to repair two holes, then cut two more in. This will work just fine.

Image

Then due to the tall rudder post, it made sense to do the rudder shelf thing with a flange bearing. Whacked together a shelf that's high enough to brace the shaft, but low enough to allow the mufflers to pass over it.

Image

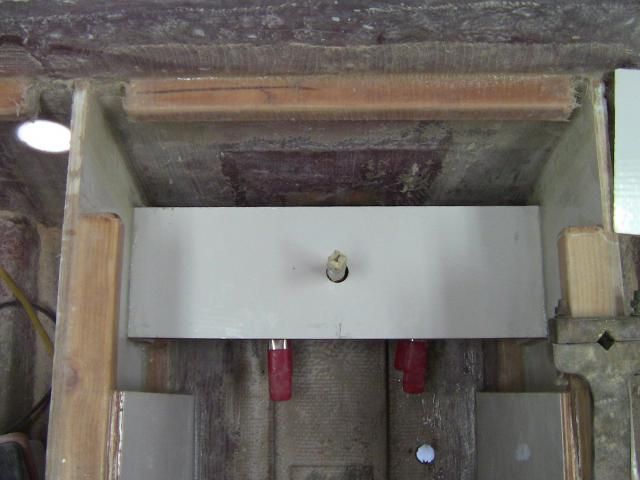
Here's the mechanical alley now. Shelf in place, two vertical supports for hanging mufflers and securing the steering cable to.

Image

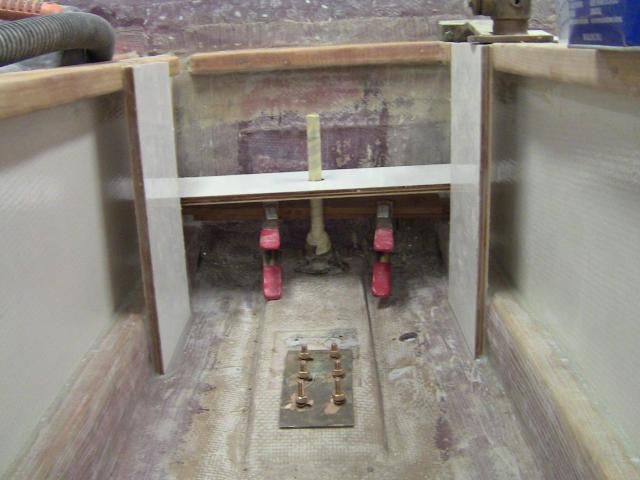
Buggered in the bolt holes for the engine mounts. These will be painted, then everything will get bedded in 3M 4000 for waterproof yet not adhered protection.

Image

And last I picked up some BilgeKote, but it warns against use on epoxy. That noted, I am doing a test patch in a variety of places to see if it sticks and cures, or if it's going to be a pain and need primer.

Image

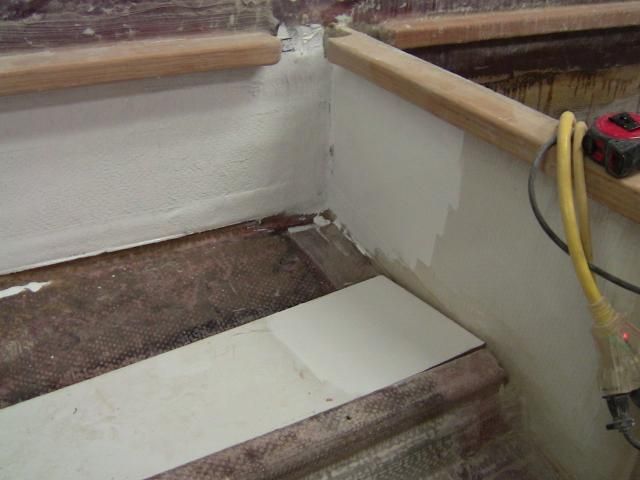
If it doesn't need priming, the bilges will get whited out this week, hardware will get mounted, and it's time to get rigging. Once partially rigged, the sole will go in, and we can sea trial this pig to see if we got it right or not...

E

User avatar
Gisteppo
Commodore
Posts: 1016
Joined: Fri Jun 22, 2007 11:26 am
Location: Lake Spokane (Long)
Contact:

Re: Uniflite Salty Pup Refit

Post by Gisteppo » Fri Apr 26, 2013 8:39 pm

An excellent warm spell drifted over beautiful Nine Mile Falls Washington (where Stag Boatworks resides) making the shop hard to get into, but the kid had a few naps and the wife took him on some errands one day so forward progress was made.

Biggest order of business is we finally settled on an agenda for the tanks. HDPE + 5200 for airtight feet. Started by finding the internal bulkheads and marking out the pad locations so that the hardest part of the tanks rest on the feet.

Image

5200 is fickle, sticky, nasty stuff to screw with during clean up, so obviously it was time to mask.

Image

Any air could result in condensation, and any opening will definitely let water in, so let's not be shy with the sticky goop.

Image

A good firm smash into the goo, making sure to get even squeeze out.

Image

Peel back the tape, and voila! Tidy, stuck, and ready to go in the boat in 24-48 hours.

Image

The forward tank has smaller bulkheads that it will reside on, so long narrow strips with the same treatment.

Image

3" stainless strap 1/4" thick will be backing up all the engine fasteners. No stinking lag bolts in this boat, she's going to be made to last a few decades minimum, and there will be ZERO engine mount movement. Through bolting only.

Image

2 coats of Bilgekote went in, a full quart for each coat, this thing has big bilges.

Image

Using the old raw water pickup site and old transducer hole, I made up backing blocks, Epoxied in place, then grabbed the hole saw and knocked them open for the 1-1/4" seacocks. Those will have scoop strainers on the hull, through bolted with 3/8" SiBr bolts. STOUT.

Image

3 suppliers are shipping in parts for various tasks now. More rigging work is to come.

Does anyone have a reasonably easy way to pop the shaft out of the coupler? I tried bolting it to the engine with a nut in between the coupler and shaft so it'd force the shaft out, but it didn't budge and I was worried about warping the coupler or busting a bolt. Any advice is appreciated, as I need to get the shaft through the PSS shaft seal.

E

User avatar
Gisteppo
Commodore
Posts: 1016
Joined: Fri Jun 22, 2007 11:26 am
Location: Lake Spokane (Long)
Contact:

Re: Uniflite Salty Pup Refit

Post by Gisteppo » Mon Jun 17, 2013 9:02 pm

So yeah, the kid is pretty fun to hang out with, the dock needed a bunch of work, put down 10 cubic yards of bark, a million meetings from work and water sampling trips meant very little work time. However, at least one major milestone was reached...

The previous owner had a TON of thru-hulls in this boat, so some of them needed to be filled. I'm new to the single skin glass boat game, so I'm kinda winging it here. Vaitses says 12:1 slope tapered to the gelcoat, so I did that.

Image

Image

Plus we're moving the exhaust, so there's this big bugger on the transom:

Image

Ramp didn't work out as well on that one with the bulkhead there so I'm just going to take the laminate around the corner a bit.

6oz fabric on the gelcoat side, a bunch of 12 oz 45/45 biax layers, then a final layer of 6oz on the interior. 72 oz of biax ought to lay up to more than the strength/thickness of the original 3 layers of roving.

Image

I'm using epoxy, so no gelcoat on the exterior side. If anyone sees a flaw in this, let me know before I start sticking stuff together. The final finish will be an LPU paint system, so not too worried about the gelcoat related issues.

Picked up the big Vetus engine room vents because they move plenty of air and they look snazzy. Marked them out on the starboard side...

Image

Got excited to get the saws out, then measured the other side. The Uniflite guys managed to make the vents on the port side about 3" further apart, so now I have to make a patch on that side as well to fill part of the vent opening before I can cut the new holes. Peachy...

Rudder shelf is in, and bracing for the exhaust and steering systems on both sides, then picked up a nice bronze rudder bushing. Haven't screwed and bedded everything in place yet, but you get the idea.

Image

Then Lo and Behold, I dropped the engine into place for the final time, with the help of SWMBO.

Image

I hate lag bolts, so she's through bolted completely through the stringers into full length stainless backing plates. No crushing of glass or stringer, this is hell for stout, as proved by accidentally picking the boat up with the hoist by them. No cracks, no pops, just flat solid.

Image

Lastly, after 2 days of getting the shaft alignment right (.015" on the last measurement), the PSS shaft seal is in place, but not completely tightened up. Still have some work to do on the boat, so I won't get that dialed until we actually get her wet.

Image

It feels really good to at least have the power plant and steering gear hanging out the bottom of the boat. Soon there will be a pair of 1-1/4" bronze seacocks going into her guts, plumbing, exhaust, fuel tanks and lines, and a little tidying up of the below deck rigging. Picked up a pair of the Armstrong deck plates as well, we will see if they really are water tight.

E

User avatar
hewesfisher
Admiral
Posts: 1886
Joined: Sat Apr 28, 2007 8:20 am
Location: Spangle, WA

Re: Uniflite Salty Pup Refit

Post by hewesfisher » Tue Jun 18, 2013 5:27 am

As always, great work Eric. Love watching your builds. [thumbup]
Phil

'09 Hewescraft 20' ProV
150hp Merc Optimax
8hp Merc 4-stroke
Raymarine DS600X HD Sounder
Raymarine a78 MultiFunctionDisplay
Raymarine DownVision
Raymarine SideVision
Baystar Hydraulic Steering
Trollmaster Pro II
Traxstech Fishing System
MotorGuide 75# Thrust Wireless Bow Mount

User avatar
Bodofish
Vice Admiral Three Stars
Posts: 5407
Joined: Sun Apr 29, 2007 12:59 pm
Location: Woodinville
Contact:

Re: Uniflite Salty Pup Refit

Post by Bodofish » Tue Jun 18, 2013 7:55 am

That brings back so many frightening memories! but awesome job!!! It seems like you'll never finish and all of a sudden, light at the end of the tunnel! You're really rock'in it!
Build a man a fire and he's warm for the night. Light a man on fire and he's warm the rest of his life!

User avatar
Gisteppo
Commodore
Posts: 1016
Joined: Fri Jun 22, 2007 11:26 am
Location: Lake Spokane (Long)
Contact:

Re: Uniflite Salty Pup Refit

Post by Gisteppo » Sat Jul 27, 2013 7:58 pm

Meanwhile, over a month, 35 house guests, a partial remodel, and 100F+ weather later...

Got out in the shop for the first time in like 40 days. Sweating my balls off because it was 99F in the shade and the uninsulated roof was up to about 150F. Still, I've had enough with not working.

Figured it was time to do the exhaust tubing, since it's gotta be easier when it's hot out.

Image

Well, I was wrong, it's still a pain to do even when it is really soft. Obviously I need to learn some industry tricks to sliding the hoses on, soap didn't do that great.

The Malibu provided me with a pair of mufflers, but the 45's on the inlets were all wrong for the angles on the Pup. Hello, Mr. Sawzall, we meet again...

Image

Now we have nicely muffled dual exhaust, ready to rally.

Image

Everything fit really well in the shaft alley, leaving lots of room for steering gear, maybe a little bilge storage, and plenty of airflow.

Image

Gotta get the tips in, and when the temps moderate a bit, I'll start glassing in those holes.

E

User avatar
Mike Carey
Owner/Editor
Owner/Editor
Posts: 7765
Joined: Sun Apr 01, 2007 10:56 am
Location: Redmond, WA
Contact:

Re: Uniflite Salty Pup Refit

Post by Mike Carey » Sun Jul 28, 2013 6:15 am

Thanks for sharing your progress. Very much looking forward to further pictures and completion of your boat. =D>
Image

"Takers get the honey, Givers sing the blues".

User avatar
Gisteppo
Commodore
Posts: 1016
Joined: Fri Jun 22, 2007 11:26 am
Location: Lake Spokane (Long)
Contact:

Re: Uniflite Salty Pup Refit

Post by Gisteppo » Sun Sep 01, 2013 7:34 pm

Man, it's been a fun but crazy summer.

The shop called to me, so I put a few other things aside and darted back out to start fiddling with the Pup again. Since it was short missions, little things got done.

First, there were an abundance of thru-hull holes from her life as a commercial fishing boat. Had to button up a couple of holes here and there, and the old exhaust port which is now in a ballast tank:

Image

Image

The following day I had a few minutes in a hot shop to get something done, so I busted out the hole saw and knocked in the new exhaust tips for the dual exhaust setup from the Malibu. It was cheaper to get a pair of exhaust tips than it was to buy a new muffler and y-pipe, so this was the decision. There will be flappers installed on these when we get closer to launch.

Image

Today, after much consternation, I think we've settled on the bow seating. Gonna go with the full walk around setup, island bench in the middle, with room to stretch out SWMBO's legs.

Image

This will give 360 degree walking space when we aren't loaded for company. Then, when we have a big crowd, a drop in piece will give 2-3 seats facing aft with backs against the foredeck. 2 more cushions will fill it in for a 7' x 8' cushioned playpen, good for big-bed night.

In this shot you can see the tapered piece of cardboard for the seat forward, and the piece aft will be the console . Looks like we will be stuck with a K-top rather than a T-top, but that doesn't give me much heartburn. I think I can have one helluva stout K-top made, and I know the console will be beefy.

Image

Week's a little clogged up, but should be able to get the tanks installed and do a little rigging, then the sole panels will be purchased and cut up to make this whole thing fit. With a 42" wide seat and 42" wide console, I think the engine cover will be made 42" as well, nice and uniform. Plus that'll give a big ass hole to work on the motor, kinda luxurious if you ask me.

E

User avatar
Gisteppo
Commodore
Posts: 1016
Joined: Fri Jun 22, 2007 11:26 am
Location: Lake Spokane (Long)
Contact:

Re: Uniflite Salty Pup Refit

Post by Gisteppo » Mon Sep 09, 2013 6:44 pm

It's time to get our heads wrapped around this thing as a final product so we don't screw it up in the design phase.

Got the tanks set in place and screwed in. Fixed in 5 points, they're SOLID in there.

Couldn't decide where to put some plumbing parts so I opted to do the mockup of the console and try to figure out what goes where, how much room we really have to work with, and what concessions will be made, as "all boats are a compromise".

Out comes the OSB, cheap and quick to make mockups with.

Image

Used some 2" black PVC to estimate how a T top would fit in there. It made an impression in that the 18" walkways were good to go initially, but the extra 3" eaten up by the T top supports really seemed to me like toe eaters. Anyone that has a CC with a T top, can you give me your dimension from the edge of the walkway to the support pipe? I can't see 14" being all that good.

Image

It looks like we are on Plan C as far as the console. Gonna do 42" of width at the seat and backrest, but bring the width of the console in to 36" so that the T-top fits inside of the shape of the seat without interfering with the occupants shoulders, as well as not being a trip hazard. Thoughts?

Image

However, all this hassle will be worth it, when there's a pair of bikini clad ladies directly under your nose and they can't tell what you're looking at behind those sunglasses...

Image

Still trying to see if we can be 100% step free as a walkaround, or if there will be a step at the bow to get over the seats. Time will tell.

Also threw a portion of the sole back in, and drew in the basic shape of the aft wraparound bench. This hopefully will seat 4-6 comfortably.

Image

Engine box is going to be like the Edgewater CCD, with a leaning post forward and a sweet bench aft.

Now to pick up some plumbing supplies and start rigging again. Anyone have a recommendation on how far to mount the steering cable clamp from the eye of the tiller arm?

E

User avatar
Bodofish
Vice Admiral Three Stars
Posts: 5407
Joined: Sun Apr 29, 2007 12:59 pm
Location: Woodinville
Contact:

Re: Uniflite Salty Pup Refit

Post by Bodofish » Tue Sep 10, 2013 7:36 am

You'll need to be a bit more descriptive on the cable clamp. Is it for the sheath?
Build a man a fire and he's warm for the night. Light a man on fire and he's warm the rest of his life!

User avatar
Gisteppo
Commodore
Posts: 1016
Joined: Fri Jun 22, 2007 11:26 am
Location: Lake Spokane (Long)
Contact:

Re: Uniflite Salty Pup Refit

Post by Gisteppo » Tue Sep 10, 2013 7:48 am

The clamp that retains the fixed portion of the steering cable, usually called a clamping block. On outboards the portion that threads into the hinge on the outboard, but on inboards it has to be bolted to a fixed point and that has a block which clamps to the non-moving piece of the cable sheathing.

E

User avatar
Bodofish
Vice Admiral Three Stars
Posts: 5407
Joined: Sun Apr 29, 2007 12:59 pm
Location: Woodinville
Contact:

Re: Uniflite Salty Pup Refit

Post by Bodofish » Tue Sep 10, 2013 10:15 am

That's what I thought but you just never know. Set the helm to center (middle point lock to lock) attach the end of the cable to the rudder arm, making sure any adjustment on that end is centered. You can now move the arm on the rudder shaft for convenience. Now just mark where the cable clamp is and make some sort of stanchion to hold it in position. If the helm and all the adjustments are centered you should be real close to going straight with only minor adjustments needed. It's really pretty easy!
Build a man a fire and he's warm for the night. Light a man on fire and he's warm the rest of his life!

User avatar
Gisteppo
Commodore
Posts: 1016
Joined: Fri Jun 22, 2007 11:26 am
Location: Lake Spokane (Long)
Contact:

Re: Uniflite Salty Pup Refit

Post by Gisteppo » Tue Sep 10, 2013 10:35 am

Ahh, if I had a console/helm/cable, that would be done already!

Unfortunately, I have no helm, as there's no console or deck to attach it to. Also, there's no cable, as I can't order it until I know the length of the run, which isn't set yet because we don't know where the console will fall.

Thus, I am trying to figure out the range inside of which I can mount the block without having to re-mount it when I find out later I put it in the wrong spot...

E

User avatar
Bodofish
Vice Admiral Three Stars
Posts: 5407
Joined: Sun Apr 29, 2007 12:59 pm
Location: Woodinville
Contact:

Re: Uniflite Salty Pup Refit

Post by Bodofish » Tue Sep 10, 2013 10:50 am

On my jet boat the distance from the rudder arm to the clamp is about 24" but it's different for each model of steering and cable. My best advice is to eyeball it and do nothing till you have the helm and cable in hand and then it will be very apparent and easy to figure.
Build a man a fire and he's warm for the night. Light a man on fire and he's warm the rest of his life!

User avatar
Gisteppo
Commodore
Posts: 1016
Joined: Fri Jun 22, 2007 11:26 am
Location: Lake Spokane (Long)
Contact:

Re: Uniflite Salty Pup Refit

Post by Gisteppo » Tue Sep 10, 2013 10:52 am

It's gonna be fun trying to get in there with a drill between two mufflers, the hull, the sole, and the wire run.

Hah!

E

User avatar
kevinb
Rear Admiral One Star
Posts: 3186
Joined: Mon Oct 22, 2007 2:43 am
Location: Eatonville

Re: Uniflite Salty Pup Refit

Post by kevinb » Fri Sep 13, 2013 7:59 pm

Dang dude,appreciate your dedication. You have some serious talent.
Our department is looking at upgrading a few rescue boats,I should have them call you. Nice work brother! :salut:

User avatar
Gisteppo
Commodore
Posts: 1016
Joined: Fri Jun 22, 2007 11:26 am
Location: Lake Spokane (Long)
Contact:

Re: Uniflite Salty Pup Refit

Post by Gisteppo » Fri Sep 13, 2013 9:55 pm

Which department is it?

I'd love to get in the biz, but I still have to go to work on my shift days, and raise a little cretin, it'd be really tough.

E

User avatar
Gisteppo
Commodore
Posts: 1016
Joined: Fri Jun 22, 2007 11:26 am
Location: Lake Spokane (Long)
Contact:

Re: Uniflite Salty Pup Refit

Post by Gisteppo » Sun Sep 29, 2013 7:11 pm

Got a chance to get to the panel supplier and pick up some stock, so I got cracking on roughing in the sole so I can get a feel for what goes where and figure out the rigging.

Image

20 feet of wide open sole, 7 feet wide the majority of the distance, seems like a huge amount of real estate. I'm sure once a console, engine cover/seat, rear bench, and all the BS for fuel fills, air intakes, etc is built in, it will shrink quickly, but for now it looks massive.

Image

Seeing just how shallow the 351 is in relation to the sole makes me want to rethink my layout. One luxury of working with the pre-gelcoated panel is she's basically a huge dry-erase board right now. Lots of flexibility to draw it out and get a feel in full scale.

Image

Also picked up almost a grand worth of ballast pumps/fittings/hose for the surf system. That'll go in, along with the fuel system, in the near future to get ready to glue in the sole. Then it is business time for a console, seats, electronics and wiring, and figure out what the hell I'm gonna do about the decks.

If anyone has any input on how to finish out the decks on this beast, I'm all ears.

E

User avatar
Bodofish
Vice Admiral Three Stars
Posts: 5407
Joined: Sun Apr 29, 2007 12:59 pm
Location: Woodinville
Contact:

Re: Uniflite Salty Pup Refit

Post by Bodofish » Thu Oct 03, 2013 8:01 am

I've used the DIY pickup bed liner stuff on the inside of my project. Very tough, a bit skid resistant (you could add walnut shells or something) and very waterproof. It's on the outside too, to protect the glass, I tested it a lot a weekend or so back floating the Yak. Very tough stuff. If you go to one of the commercial guys and have it sprayed, it can be any color you want as the base is white. Or if you use the Durabak brand it comes in colors but it can take a while to order, I would have used it but I'm a kind of last minute guy.
Build a man a fire and he's warm for the night. Light a man on fire and he's warm the rest of his life!

User avatar
Gisteppo
Commodore
Posts: 1016
Joined: Fri Jun 22, 2007 11:26 am
Location: Lake Spokane (Long)
Contact:

Re: Uniflite Salty Pup Refit

Post by Gisteppo » Thu Oct 03, 2013 7:27 pm

Noodling about on the layout has been fun the past few days, but it made me rethink part of the boat and that means cutting out work that I did already. Ugh...

In order to minimize wasted cockpit space (not eating up room in the walk around area), I am trying to make plenums that run from the big Vetus intakes to the engine room. Rather than hoses, this makes more sense to me. Unfortunately I put in my big sole cleats right in the way, so had to cut a couple feet of them back out.

Image

You can see where the glass wrapped fir ends. This will be where the 26" x 2" plenum space. One would be sufficient for this engine application, but I want a c o l d engine room, so double the pleasure...

Image

Only those who have stripped 50 years worth of antifouling paint off an old hull will feel the misery in this photo:

Image

I'm never doing this again, on any boat. Chemicals only peel down to this one certain layer, and that stuff is HARD. I can't explain what the hell paint it may have been, but chemicals won't strip it, and even 36 grit takes an inordinate amount of time to cut through it. So, it stays, gets scuffed, and will be painted over with new antifouling. Bleh.

E

Post Reply