Search
Latest Articles
Multiple Fly Rigs for Trout
by Charlie Robinton, July 04, 2017
Fly anglers are full of ingenuity, and the most successful fishermen are constantly experimenting with different rigs and techniques to put more trout on the end of the line. Meanwhile, modern equipment, leaders, terminal tackle, and flies have enabled anglers to push the envelope of what is possible. These days, it’s common for anglers to fish up to three flies on the end of their leader instead of just one. This article will outline the benefits of fishing multiple fly rigs and introduce three modern rigs and tactics that are sure to increase your success.


Why Multiple Flies
Fishing with a single fly at the end of your tippet is simple and rewarding. When your cast is working correctly, your presentation is sound, and the fish are responding to your pattern, you may not feel the need to change anything. Unfortunately, in fly fishing the challenging days often seem to outnumber the days when everything goes perfectly, and we anglers always want to find the tactic or method that will tip the odds in our favor. On those challenging days, fishing with more than one fly on the end of your line lets you save time by exploring multiple possibilities at once. You can do this by fishing flies of different patterns, sizes, colors, or even mass or buoyancy. Each will help you quickly determine what the trout prefer and where they are holding in the water column during a given time.
The following rigs and techniques are not the only options for fishing multiple flies, but they can give you a solid foundation from which to experiment and find what works best for you.
The Tandem Nymph Rig
These days, you see multiple fly rigs being used by anglers when fishing subsurface with nymphs. Because we can’t look beneath the surface and see exactly what the trout are feeding on – as we could if there were insects hatching on the surface and trout rising – a certain amount of guesswork is involved. Fishing multiple flies doesn’t replace the tried-and-true strategies of seining, rolling rocks, and understanding your local hatches to make your fly choice, but it can be deadly when used in combination with these techniques.
The tandem nymph rig is one of the simplest. It involves attaching one large, heavy fly to the end of your tippet, tying a piece of tippet to the hook bend, and then attaching a second, smaller fly to the end of that. The possibilities for fly combinations are endless, but as a rule the larger and heavier fly is always the first one attached to the tippet, with the smaller fly trailing, which aids in proper leader turnover while casting.
The most common way anglers present this rig is by using the dead-drift technique while suspending the nymphs near the bottom below a strike indicator. The distance from the indicator to the first fly should be set so that the leader between them is approximately 1.5 times the depth of the water you are fishing. To help the team of flies reach the bottom, you should choose a heavily weighted fly for your first fly, sometimes called the point fly. Alternatively, some anglers choose to add weight, such as a small split shot or two, 10 to 12 inches above the first fly on the tippet. The length of tippet between the point and trailing fly should be between 12 and 18 inches.
There are some general rules you can follow to select flies for your “team.” Many anglers use a large, flashy, or brightly colored “attractor” as the point fly, hoping that this will capture the attention of fish and draw them in to investigate. If you choose a fly such as this, counter it with a smaller, more natural fly as a trailer. If you know the hatches on the water you’re fishing, you should go with something you expect the fish to be feeding on. Another strategy of many anglers out here in the West is to simply use a big, heavy pattern imitating an insect that is present year-round as a point fly, such as a stonefly or caddis nymph. They follow this with a smaller, more natural fly that hopefully matches something the trout are feeding on at that time. Experienced anglers who know the hatches and seasonal patterns on their local waters may choose to use two natural flies that imitate two insects that are hatching at the same time. They may even choose two flies that imitate the same insect but vary slightly in size, color, or profile to help determine exactly what picky fish might be eating. I would encourage you to explore all these strategies to learn the best application for each. Change your flies often, and when you find one that works, keep switching the other one until you find a winning team.
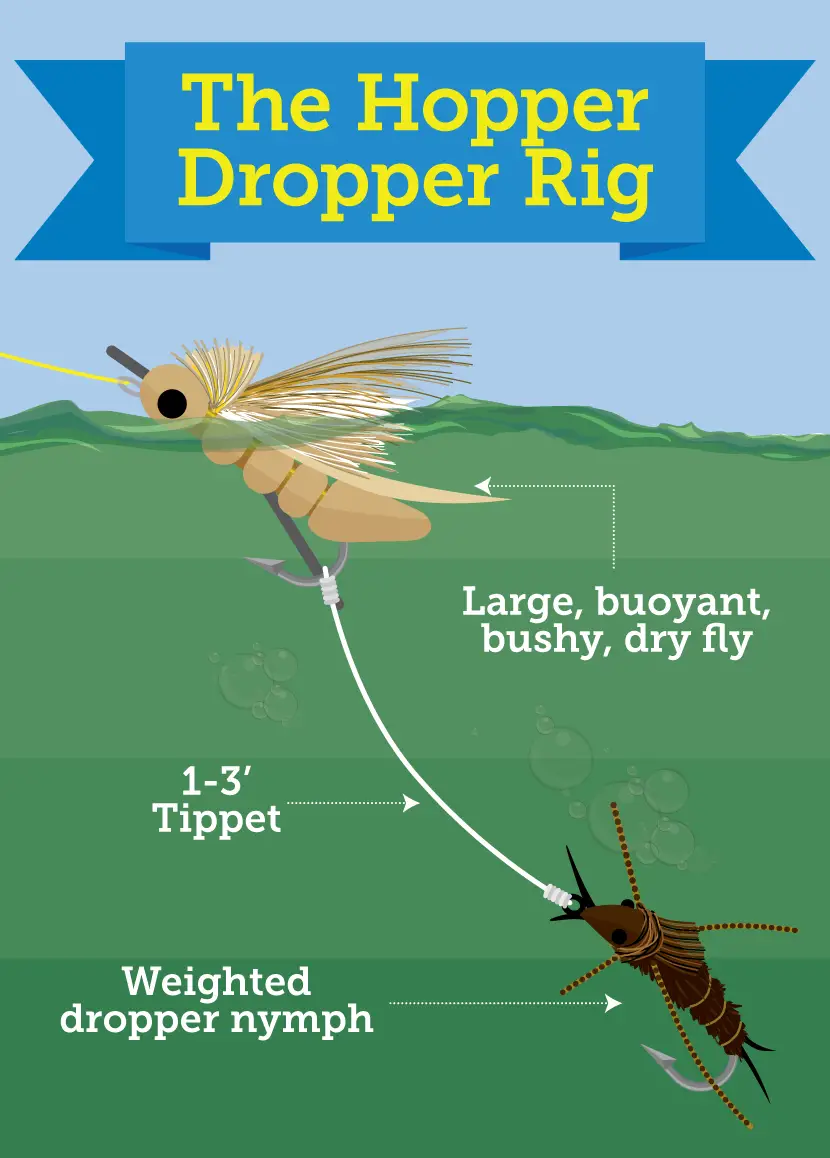
While the tandem nymph rig allows you to put multiple offerings in front of fish that are holding at a certain depth, there are other rigs that allow you to present your flies at varying depths and explore multiple holding areas at once. The hopper-dropper method is the simplest and most widely used of these. This method involves attaching a large, buoyant dry fly to the end of your tippet as the point fly, tying a separate piece of tippet to the bend of that hook, and then tying a weighted nymph. The only requirements are that the first fly is buoyant enough to suspend the second and that the second is not so large or heavy that it will sink the first. With a little experimenting, you should easily be able to find this balance.
The hopper-dropper rig is a wonderful option during the warmer months, when many streams have hatches of large insects. Montana fishing guides started using it on hot days during the months of July and August, when mayfly hatches were minimal but trout would hold in the shade and wait for a grasshopper to fall into the water or a nymph to drift by beneath the surface. This rig allowed anglers to increase their odds of catching fish by targeting both fish that were willing to rise aggressively to a dry fly and those that were sulking below the surface.
You can fish this rig with a traditional dead-drift approach as you would normally fish a dry fly, but remember that there is a nymph suspended below. This means you must pay extra attention to your dry fly: If it exhibits any unnatural movement, pauses in the current, or dips below the surface, it could mean that a fish has taken your nymph and you need to set the hook with an upward lift of the rod tip.
Although it is called the hopper-dropper rig, you are not limited to using only a grasshopper imitation as your point fly. Almost any big, buoyant fly will do. If the waters you fish have hatches of large stoneflies or caddis, then imitations of these can be good choices. In other places a large, colorful attractor pattern imitating nothing in particular can be the ticket. Experimenting and learning about the hatches on your local waters are the keys to success here.
For the dropper, I personally have the most success using small- to medium-sized bead-head nymphs with a bit of flash or color to help attract the fish. Flies weighted with tungsten beads sink into the strike zone faster. During times when the trout are feeding heavily on a certain nymph, I will trade out the colorful attractor for a more natural pattern that matches the food source or even attach it to the existing nymph as a third, trailing fly. You can experiment with different distances between dry and dropper, but I find the sweet spot to be between 12 and 36 inches.
The Modified European Nymph Rig
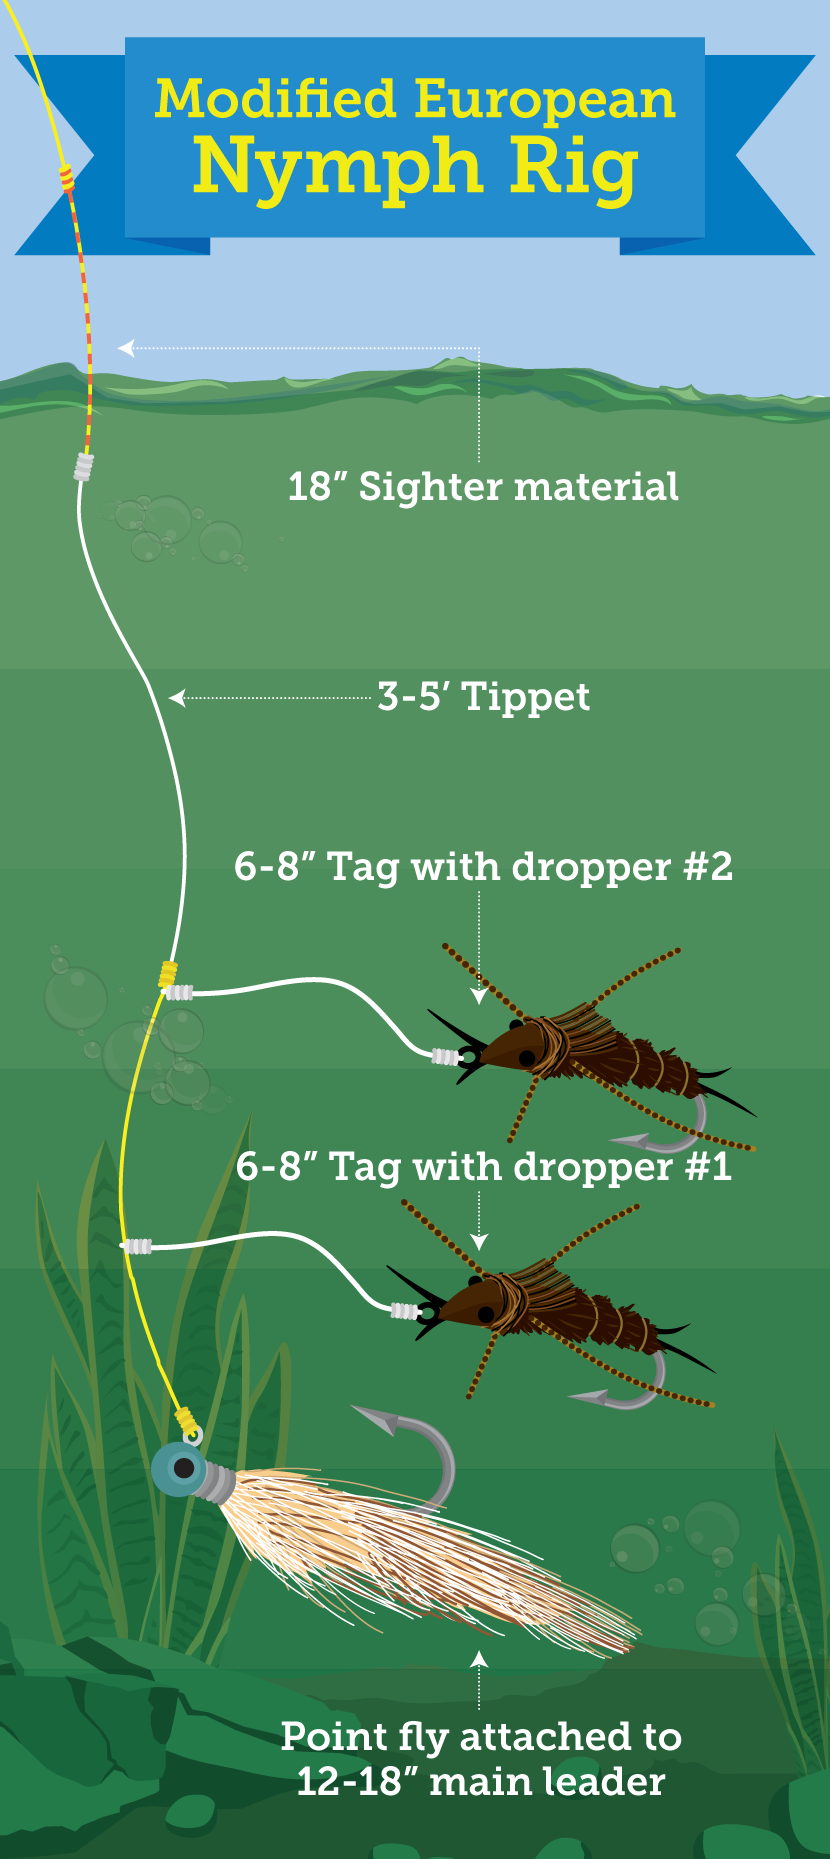
While the previous two strategies cover rigs with multiple flies tied in line with one another, the modified European nymph rig separates the flies onto individual “tag” sections of tippet. This rigging style freely suspends the flies, allowing them to drift more naturally, and offers the advantage of being able to rig and fish different nymphs at different depths. A search on European nymphing will reveal a multitude of different rigging and presentation strategies, but here I describe the one I have used on my local streams and all around the Western United States with great success.
When using the modified European rig, I generally go with a tight line nymphing method, although you can use the rig dead-drifted under a strike indicator as well. One of the main differences between this and the tandem nymph rig is that the point fly is situated at the very end of the leader while the smaller flies dangle from their own tags up above. There is no added weight, so it is important to choose a fairly heavy fly for the point position. In choosing the second and third flies, follow the same rules as you would on the tandem rig.
The advantage of this rig is that your heavy point fly will help everything sink into the strike zone quickly, while the other flies drift naturally in the feeding lanes above the bottom, where the fish are holding. Using this rig, you can position your second and third flies anywhere on the tippet, but I find a distance of 10 to 18 inches between them to be a good start. Keep the tags you attach your flies to fairly short, no more than 8 inches, or they will constantly tangle.
A Note on Tight Line Nymphing
Tight line nymphing is an art that deserves its own article, but I will present a brief overview for those who are not familiar with the method. Essentially it involves the angler reading the water and approaching stealthily to reach a position within a rod’s length of where the fish seem to be holding. With only the length of leader and flies out the tip of the rod, the angler lobs the rig upstream of the fish. At this point, the angler lowers the rod tip close to the surface of the water to allow the flies to sink, waiting for the current to carry the flies to a position directly below the rod tip. Once the flies have reached this position, signaled by the butt section of the leader becoming tight and completely vertical where it enters the water below the rod tip, the angler follows the flies downstream, working to keep the leader in that vertical position.
Done correctly, this technique allows an angler to “feel” the flies along the bottom, raising or lowering the rod tip to allow the flies to sink further or avoid snags. Because of the direct “tight line” connection between the flies and the rod tip, the take of a fish will immediately register, allowing the angler to respond quickly by setting the hook. With practice, this is an extremely efficient and productive method of covering small sections of known fish-holding water.
The Challenge of Multiple Fly Rigs
Fishing with multiple rigs is an effective strategy for determining which fly the fish might prefer and where they are holding in the water column, but it presents challenges to the angler. Most significantly, adding multiple flies to the leader can create trouble in casting: more weight and more hooks means the entire system is prone to tangling if not handled correctly.
When fishing with multiple fly rigs, it can be helpful to slow down your casting stroke and add a deliberate pause in the back cast to allow time for the entire rig to unroll behind you before beginning your forward stroke. The heavier or more crowded your leader, the more important this becomes. Another tactic is to cast with a slightly more open loop to avoid the rig collapsing on itself on either end of the cast. You can do this by drawing the rod through a wider arc during the cast, softening the stop at the beginning and end of the cast and allowing ample time for it to unroll. Try to keep false casting to a minimum when fishing with multiple flies, as each successive cast is just another opportunity for the rig to tangle.
When tight line or indicator nymph fishing with multiple flies, consider ditching the overhead cast altogether and instead using anchor-based casts, such as the roll cast or water haul. Having no back cast to deal with really makes it easier to prevent tangles, and done correctly these casts are more than capable of reaching the distances typically needed for nymphing.
Simply put, fishing multiple flies allows you to put more offerings in front of the fish and cover multiple bases at once. You can eliminate unproductive flies and quickly zone in on what is working at any given time. Give one of these tactics a try on your home water and start catching more fish.
This article was originally published at Fix, an online blog featuring great articles on a large variety of topics. Used with permission.
"We are the Fix Blog, a lifestyle blog devoted to bringing you expert content to make your life easier. We’ll cover everything in and around your home, like landscaping, gardening, outdoor activities, home maintenance and repairs. From products to projects, we’ll be providing you with a daily fix of content from our experienced and knowledgeable team of writers."
Written by
Charlie Robinton
Charlie Robinton has been a fly fishing junkie ever since he hooked his first trout on a fly at age 10. He is a custom fly tyer, fly fishing instructor, and writer living in San Francisco who loves to share his passion for fly fishing and the outdoors with others.