Search
Latest Articles
Why Your Fish Finder Is A Waste Of Money
by Nathan Nesbit of GoneFishingNW.com, June 10, 2017
If you hang out around a marina, boat launch or other places where fishermen are with their boats you’ll notice that just about every boat is equipped with a fish finder. It is considered an essential piece of equipment, but for most people it is a waste of money because it doesn’t help them catch more fish. The reasons for this are many.

Why Your Fish Finder Is A Waste Of Money
Lets examine some common reasons which cause fish finders to be a waste of money, instead of a useful tool.
Bought The Wrong Unit
Perhaps the most common reason for not getting value out of the fish finder starts at the store. Many people buy a unit which just isn’t up to the job. It might be the unit that was on sale, or maybe it was just the cheapest unit available.
The cheap units are going to find bottom, but will struggle being the great fishing tool a better unit would be.
Obsolete Fish Finder
If your tablet or smartphone was five or six years old, then you’d replace it with a newer model. So why not your fish finder? Like your smartphone modern fish finders are sophisticated units running complex software.
Make sure to upgrade your fish finder on a regular basis. Once your finder is about four years old you should seriously start thinking about replacing it. If it is over six years old then it is likely overdue.
Build On A Good Foundation
Even the best of fish finder units will not function properly if not correctly installed. Bad installations can account for a number of issues people have with their fish finders not working properly.
Often times I’ll hear people complain about such and such a brand or unit model when really the problem has to do with how the transducer or fish finder is mounted. Make sure to read the installation instructions very carefully and follow them.
If you have a hard time getting good results out of your fish finder, then the first thing to do is to double check it is installed right. Don’t assume that the marine shop installed it correctly.
Not Configured Correctly
Many people just accept the default settings, not realizing this is hurting their ability to use the fish finder as a fish catching tool. Many finders have settings like fish identification, different colors, sensitivity adjustments, transducer selection and so on.
How To Make Your Fish Finder A Fish Catching Tool
Now that we’ve covered various mistakes people make with fish finders, lets talk about how we can get maximum value out of them.
How Fish Finders Work
Fish finders are complicated systems and one could write a book explaining it. So I’m just going to highlight a few key concepts and features. Each brand has its own marketing names for the various features, so you will need to mentally map your brand’s name to the concepts.
The Basics
In it’s basic form a fish finder consists of a transducer and a head unit. The transducer generates an underwater sound wave at a given frequency. When that sound wave encounters something it bounces off that and returns back to the transducer. This return is then shown on the finder.
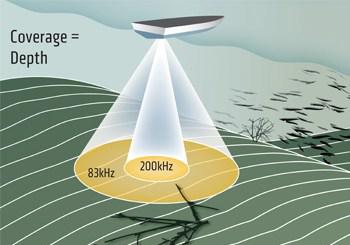
The sound wave spreads out as it travels. It is narrow just below the boat, and at its widest when it hits the bottom of the water column. This is known as the sonar cone, and it can be measured in degrees. Wider cones are going to capture more fish and structure.
Downscan Sonar
Downscan sonar is a high frequency sonar. The high resolution this frequency gives can really help define what is under the boat.
For example, an underwater tree might look like a school of fish or a bait ball with regular low frequency sonar. However, with downscan sonar you will be able to identify it as a tree, as you’ll see the trunk and branches.
CHIRP
CHIRP is a relatively new sonar technology. It has been common in mid-range units for several years now. What it does is combine data from different sonar frequencies, such as downscan and normal sonar. It tends to provide better images than the frequencies used separately.
Side Scan Sonar
Side scan sonar used to be a feature exclusive to high end units, but in the last couple years it has made it to mid range units. It is a high frequency sonar beam that projects a narrow beam to the sides of the boat. This allows you to see things to the side of the boat.
Buy The Right Unit
Getting the most out of your fish finder start with purchasing the right unit. This is a moving target as the technology keeps changing, however if I were to go shopping for a unit today this is what I’d look for:
* A large screen – at least 7 inches
* CHIRP, down scan and side scan sonar
* GPS
* On the fly mapping
Expect to pay between $600-$900 for a unit which meets all those qualifications.
Install It Right
After you have your unit picked out and purchased it needs to be installed. As we discussed previously proper installation is key to correct operation. They typically are relatively easy to install.
First read the directions very carefully, and then re-read them. Then follow the installation instructions carefully.
Learn How To Use It
Spend time reading the users manual, watching training videos from the manufacturer and pro staff, and play with the unit. Become familiar with what the unit can do and how to make it do it.
Zoom In
Often there will be a specific depth that we are focused on. Using the zoom feature of the sonar is a way to get more information about that depth by providing more pixels to render that sonar data. This will give you better images of the fish at that depth.
Sonar and Downscan
Sometimes you may see something on the finder that you aren’t quite sure what it is. In these cases putting the downscan side by side with the sonar can help you figure it out.
Below is an example from a lake I fish. In a particular location there is something that looks like a thick school of fish. However it is actually a couple trees from before the lake was made by a dam. In the downscan you can see the tree trunks sticking out.
Determining Fish Depth
You may think that if the fish finder shows a fish down at 50 feet, that the fish is 50 feet down. That may not be true. Remember the finder measures distance from the transducer and that the sonar cone spreads out.
If the fish is directly over the boat then the depth reading will right on. However if the fish is at the edge of the cone, then the distance from the transducer will be greater than the depth of the fish. This effect will be worse the farther the fish is off center and the depth.
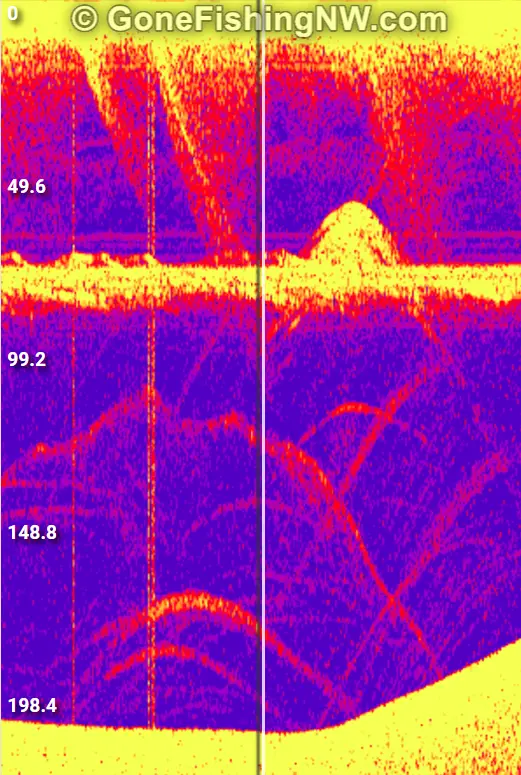
In this sonar image below we were catching fish about 75 feet down. You can see strong fish returns around the lines from the downrigger balls. However you can see some fainter marks displayed at 120 to 140 feet. These fish are near the edge of the sonar cone, which was 83kHz. This means the fish are really 70 to 85 feet which is right in the zone where we were catching fish.
Hit A Fish School Again
Sometimes you’ll have a bite or catch a fish, and then you want to go back to that spot since other fish are likely to be there. You can easily do that by saving a waypoint in the GPS and then navigating back to that spot.
Practice
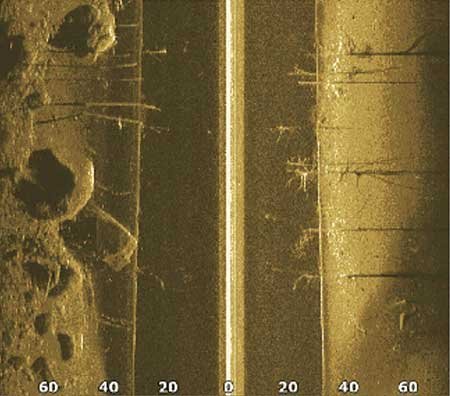
Lastly spend time on the water watching the finder and experimenting with the settings. Learn what different types of bottom look like. Learn to identify fish from structure, sonar noise and jetsam. For example below is a sonar picture of a couple of fish right on bottom.
One does not become a fish finder expert overnight, so expect to spend time with the unit practicing.