Fishing Herring for Salmon
by
Jason Brooks, June 07, 2020
When the sonar shows a large blob on the screen with a few arches underneath your about to get bit, as long as you are using the right bait. If it is a herring ball and Chinook are the arches then you better have a proper sized, cured and cut-plug herring rigged up. Herring are a staple for most salmon species as they feed in the ocean, sounds, and bays and anglers know that it’s hard to beat a good herring bite. But there are a few things that you can do to increase your catch rate while using the delicate baitfish.
Herring go through a lifecycle which begins in kelp beds and eel grass in protected coves and bays. From there they eventually make their way out to the open waters and school up by the thousands. Protection by numbers is how they survive as they are almost at the bottom of the food chain. Knowing that smaller sized baitfish often stay in the protected waters it makes sense to downsize your baits when fishing inside. The open waters find adult herring and there you should use larger baits. Just buying a package of herring and sticking a hook in them won’t necessarily catch you fish.
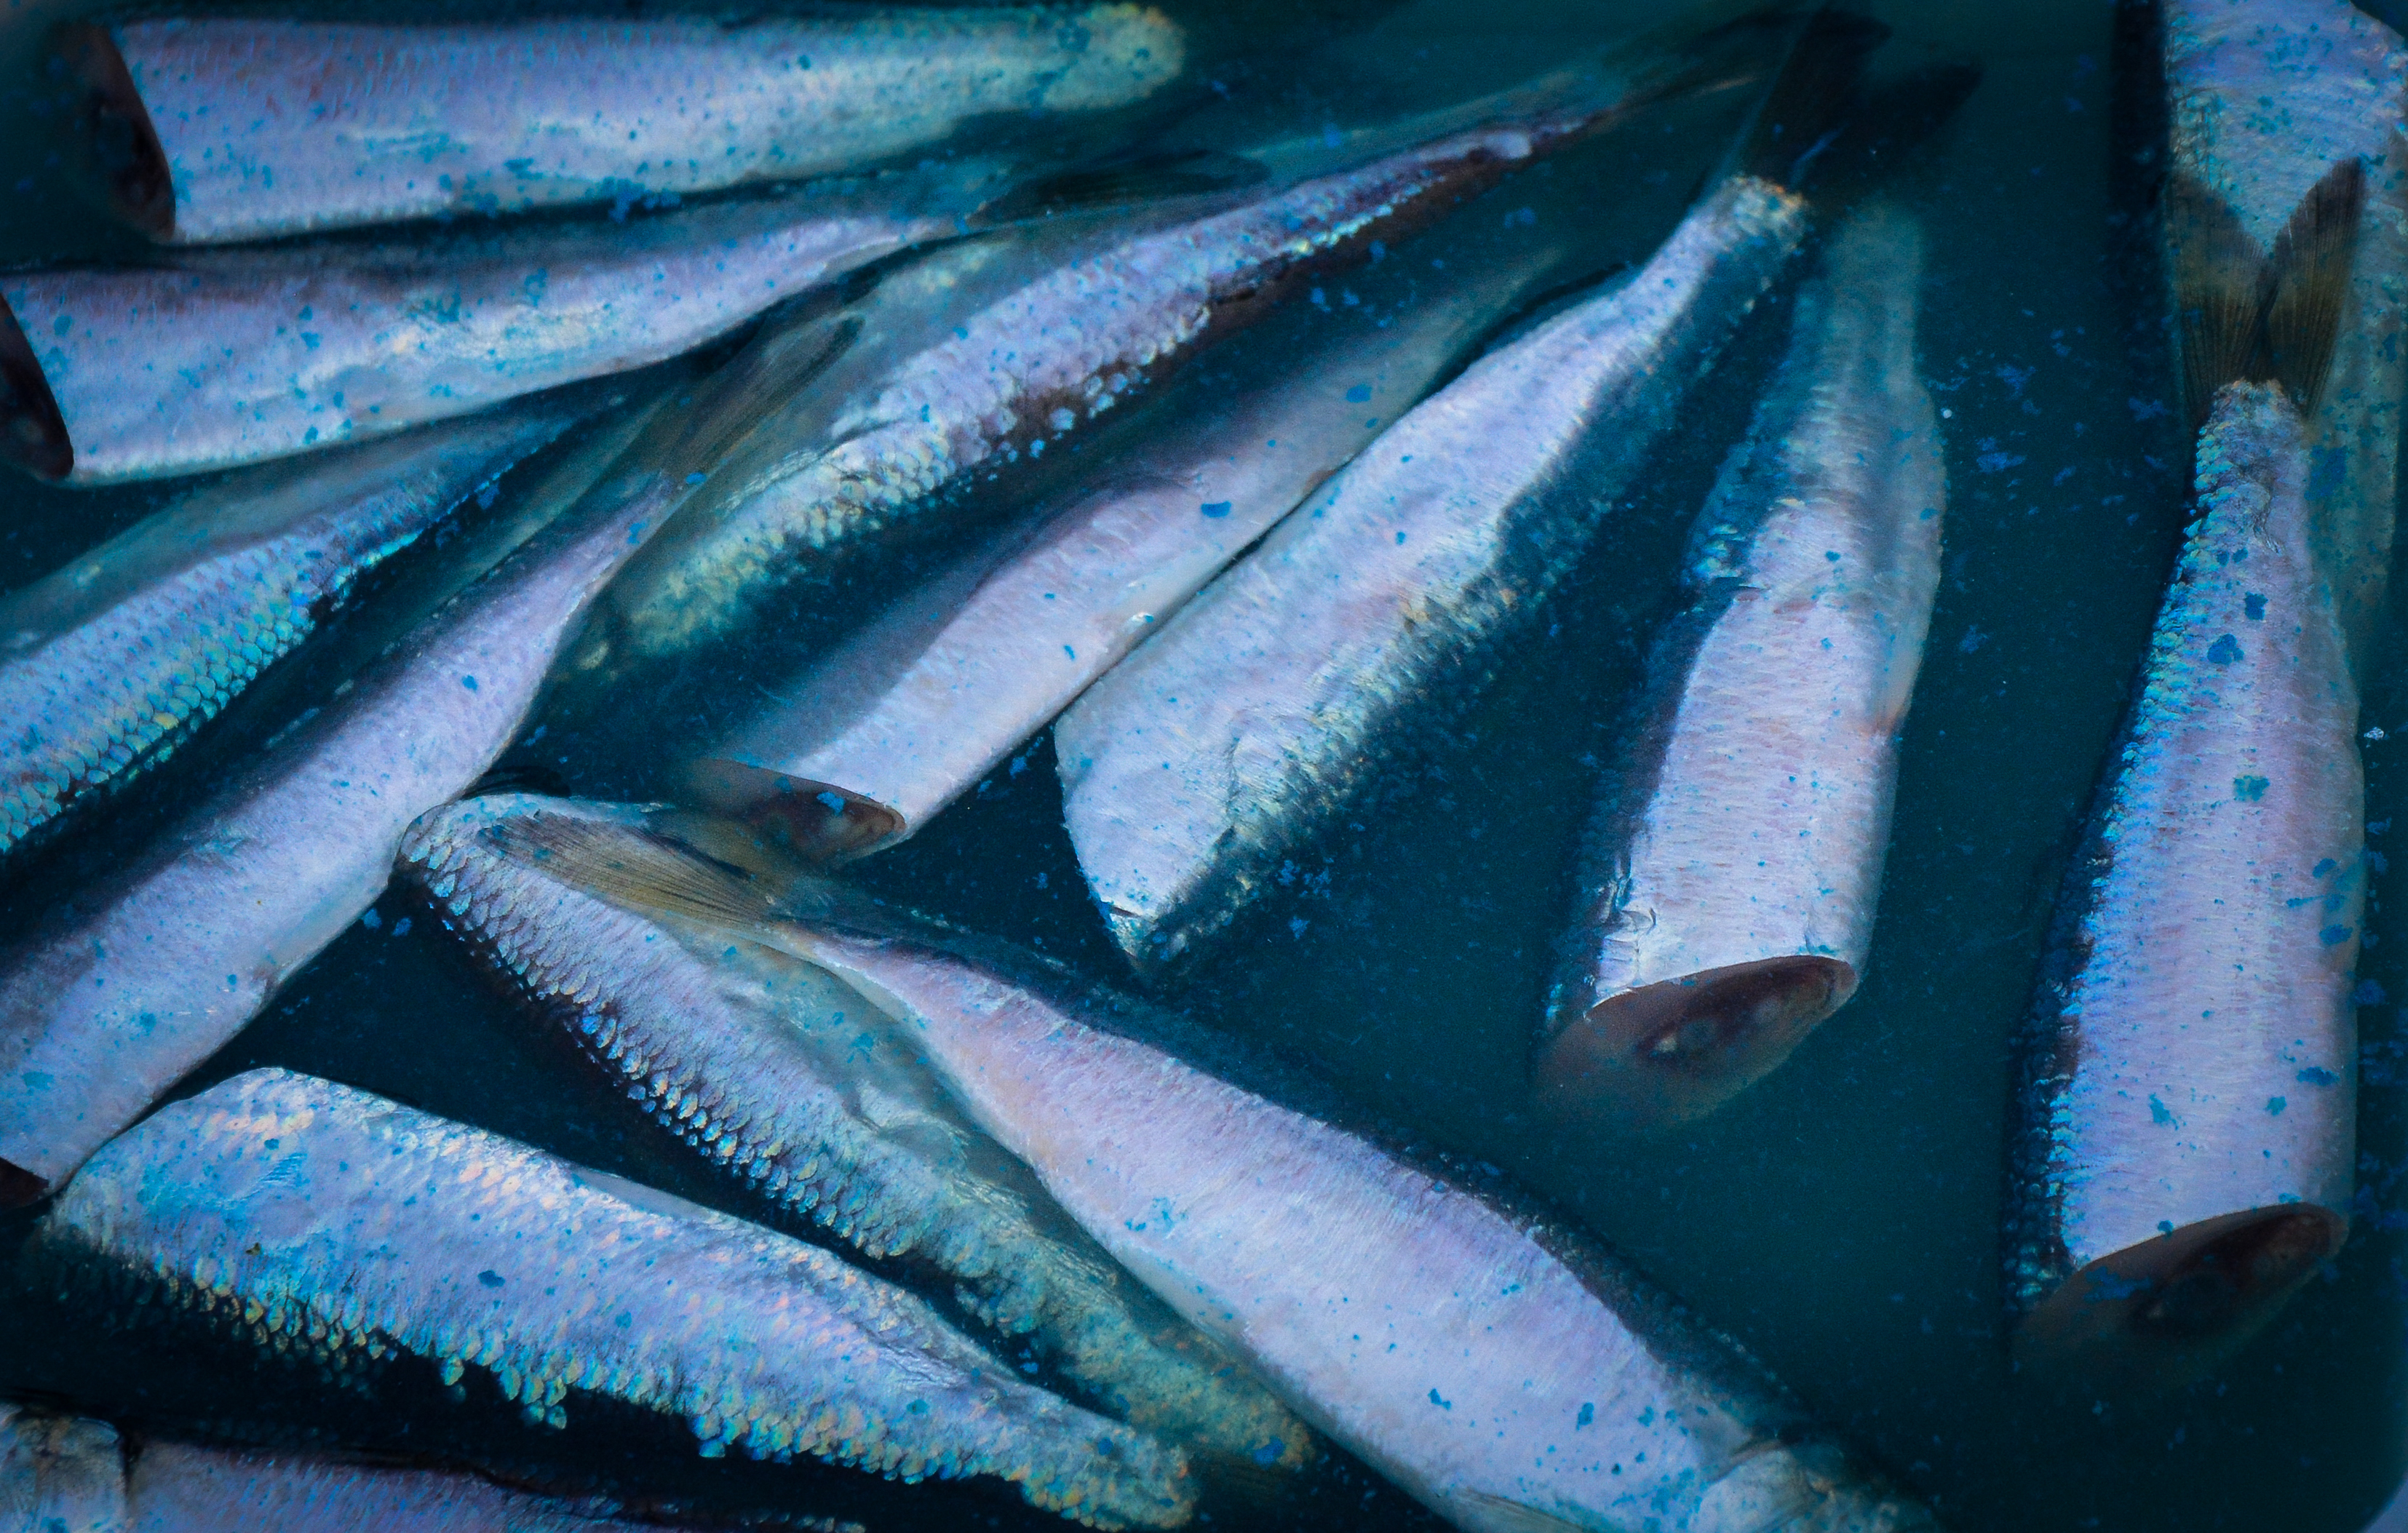
Sizing is one of the most important parts of fishing herring. Last summer while fishing Nootka sound we got word that the fish were preferring smaller sized herring. This might be due to the warm waters of the everlasting “blob” affecting the northern Pacific the past few years-stunting the baitfish size-or that the salmon were on the “inside” and eating juvenile herring. Either way we picked up some “red label” sized herring before our trip and it made a difference. Most bait companies utilize a “color” system for sizing the fish. Black label being the largest at 8 inches or more, then blue label, green label, red label, and orange label being the smallest. Some companies also have a purple label that is between black label and blue label. It is best to find a company that has good baits and then figure out their sizing standards. The black label is often used by halibut anglers and rarely used for salmon fishing. Blue label is used by both those targeting lingcod as well as some Chinook fisheries. Green label is the universal “go to” size and is widely available. Red label is good for Coho fishing or fishing near kelp beds for feeding Chinook. The orange label is often used by float fisherman who will suspend the small herring for Chum and Coho while fishing from shore along kelp beds and tributary mouths.
Once you figure out which size of herring suits your day of fishing it is time to pick out the best ones for the trip. Be sure to look at the eyes of the herring, as they will often freezer burn first. A pasty or cloudy yellow eye means it has been in the freezer for a long time and these are best used for crab bait or lingcod fishing. The scales should be shiny and bright and not missing. Commercial herring fisherman will catch the fish and often hold them in net pens for a long period of time. They will stop feeding the fish and eventually harvest them by using methods that won’t cause the scales to fall off or be torn off. Once you find a company that can kill the herring and package them correctly it is best to stick with that company. Also be sure to look at the package to make sure there are no small pin-holes in the vacuum sealed bag that will lead to air getting in and causing freezer burn if you plan on storing your baits for a while in the freezer.
To be ready for the days fishing you need to thaw out the baits. Always put a hole in the vacuum sealed bag when thawing them otherwise the pressure from the vacuum will crush the herring as they thaw. It is also a good idea to brine them. There are several good commercial brines on the market that add bite stimulates as well as preserve the baits. One of the best is Pro-Cure’s “Brine-n-Bite”. They also make a “complete” brine which is pre-mixed in offered in a bottle that resembles a two-litter soda bottle. The previous is a powder and can be stored easily on the boat or on a garage shelf as the container is much smaller. If you do plan on using one of the powder style commercial brines that calls for adding water, then use distilled or bottled water. Never use tap water as most domestic water is treated with chlorine and fluoride. Another good water to use is ocean water as it has natural salts to it that help preserve the bait. If you don’t want to use a commercial brine then simply put the herring in a zip-loc bag or plastic container with rock salt. This will help draw moisture out of the fish as well as brighten them but leave the essential oils that the herring is known for and attracts salmon. Not all rock salt’s are created equal as some will be food grade and others are for pickling, ice cream makers and such. Again, Pro-Cure has come through with a rock salt that has added scents and attractants which is a good choice to use for salmon fishing.
Some fisheries do better with dyed herring. Spring chinook in the Columbia often bite a chartreuse colored bait. Blue is another common color as it seems to brighten the bait. If you decide to dye some herring be aware that the dyes are permanent and only use disposable containers and wear latex gloves. It is best to dye a few different colors and have some natural colored baits as well to see if the salmon prefer one over the other. There are also “bluing” agents or “brighteners” such as “Bait Brite”, again by Pro-Cure. What these do is allow the natural shine of baits to really “pop” and reflect natural light. Think of them as an additive that shines the scales.
After you have figured out what size you want to use, picked out the fresh baits, thawed and brined them, maybe dyed a few then it is time to go fishing. For the open ocean angler fishing a herring can mean several different techniques. The river angler pretty much uses one or two ways to fish the baits.
A plug cut herring is the most common by both the salt angler and river fisherman. You can purchase a “plug cutting guide” which is a small plastic or metal trough that has slits in it. Put the herring inside and use the slits as a guide to get the correct angle. You will notice that when you use the guide it cuts the head off at an angle as well as the side of the fish. A well cut bait has two angles to the cut, the first is from the backbone down to the belly. The second angle is along the side. The guide makes sure the angles are the same, for Chinook it is an approximate 60-degree angle down from the top of the herring to the belly and a 60-degree angle from one side to the other. For Coho the guide cuts at an angle about 45-degrees.
The angle is often determined by the species of fish you are targeting but the water conditions can determine how you cut your baits as well. In strong currents a fast spinning bait might fall apart. In slack water the slow roll might just wobble and not roll. Always be sure to check the bait by running it beside the boat before you deploy it out and troll them. Chinook are known to prefer the “slow” roll which is a herring cut with a 60-degree angle. The Coho “cut” is a 45-degree angle and the spin is much faster. But regardless of the angle the hooks must be inserted correctly. The Chinook cut is simple to put on the hook as the slower spin is done with the leading hook placed near the backbone. First insert the rear hook into the side of the herring near the anal vent and poke the point through on the same side as where you inserted it. Then simply put the front hook into the bait by inserting it near the backbone from the inside of the bait. Make a few adjustments until the herring is slowly spinning to your liking. This is done by adjusting where you insert the front hook because this is where the cut plug herring is being pulled from. Some will offset the hook inserted to stick straight out one side for a more erratic spin. The closer you put the hook point to the backbone the less erratic of a spin as it’s being pulled straight. For the faster Coho cut you can use the same hook set-up. From here make adjustments to it so it gives you the correct “spin”.
Another option is to cut plug the herring at a steep angle, slightly less than 90 degrees and insert the front hook from the outside. Just below the backbone push the hook all the way through from one side to the other, inserting it first into the leading side (longer side) and have it come out the shorter side. This roll is very “non-aggressive” and tends to stay on the hook easier and fishes for a longer time. The bait tends to swim straight and then roll occasionally. It is a cut plug to use when you can’t keep a steady speed due to tides, rips, and wind.
Most anglers remove the guts, creating a cavity or “plug”. This cavity actually does more than just keep the guts from messing with the roll. It creates a pocket that the water fills as you troll and acts like a miniature sound chamber which mimics the “thump” of a wounded baitfish as it tries to swim and flutters its tail. You can also add some scent into the cavity to create a better scent trail. A leader with two needle sharp hooks, sized correctly for the size of herring you are fishing is then used. For green label herring-since it is the most commonly used-3/0 or 2/0 light wire hooks work well. Space them apart from three to five inches depending on the bait size and type of rigging you prefer.
If you find that your baits aren’t staying together, either from not proper brining, or currents tearing them apart then you can rig the herring whole. By inserting the far hook near the tail and making sure it is in the backbone and then wrap the leader around the herring and insert the front hook through the head of the herring you can create a bend in it and this causes it to roll. Another method calls for a half-hitch around the head. It takes some practice to run a full herring and get the proper roll but it is the most durable way to fish the delicate baits.
When it comes to the spin of the herring it all depends on your personal preference and what you find works. Some say that Coho like a tight spin while the Chinook like a wobble or “roll”. Another friend of mine who is an avid salt angler likes the herring to have an extremely tight spin, to the point that it doesn’t look like it’s spinning but instead swimming. His theory is that the salmon would rather chase after a baitfish that looks healthy and is fleeing instead of a wounded one. It works as we have caught many fish-both Chinook and Coho-using this tight “swimming” spin.
Another option on how to fish herring is to use a helmet. Most of them are similar to anchovy hoods and you will notice they are a piece of plastic that you put onto the front end of the cut plug herring. The hood is shaped to the “cut” you are trying to accomplish and is a quick way to get baits into the water during a hot bite. One reason why anglers might not want to use the hoods is that you can’t tweak them to your liking as well as the body cavity is blocked and so less water is being pushed through the plug and less scent is being dispersed. Slide the hood down the leader and put the hood over the bait with the head cut off. Use a toothpick to secure it and then insert the hooks. Because the hood is secured with a toothpick or pin you can insert both hooks further back in the bait. Some like to use an off-set hook placement so one hook is sticking straight out on one side and another hook is sticking straight out on the opposite side. Since the bait is spinning this will increase your hook-up when the salmon bites. The hoods are very simple to use and can get them in various colors and UV enhancements. Other hoods are a clip that has ridges or teeth and you put the head of the herring inside and secure it with a toothpick or rubber band. These hoods don’t look very natural and can tear the baits but they are effective in getting the proper spin as well as you can use a herring strip instead of a whole bait.
The herring strip is becoming very popular as it can mimic a candlefish as well as a herring. Fillet the herring which will give you two baits and extend your bait for the trip. A well brined herring strip will fish for a long time. You must use a herring helmet or hood to use the herring strip and they are the “pinch” style, not the cut plug style. If you use a normal size hood you can leave the fillet at full size but a good option when sandlace are present is to cut the fillet in half lengthwise, making two small strips. One herring will give you four baits. Brine them and use a scale brightener. Then insert one of the strips into the helmet. These can be fished at a faster trolling speed and used close to a dodger. The herring strip is also a great way to use left-over bait. At the end of the day fillet out the herring and make the strips, then put them on the Pro-Cure Scented Rock Salt and keep them cool. The strips will toughen like leather but retain the oils and shine and can be used for a day or two as long as you keep them cold.
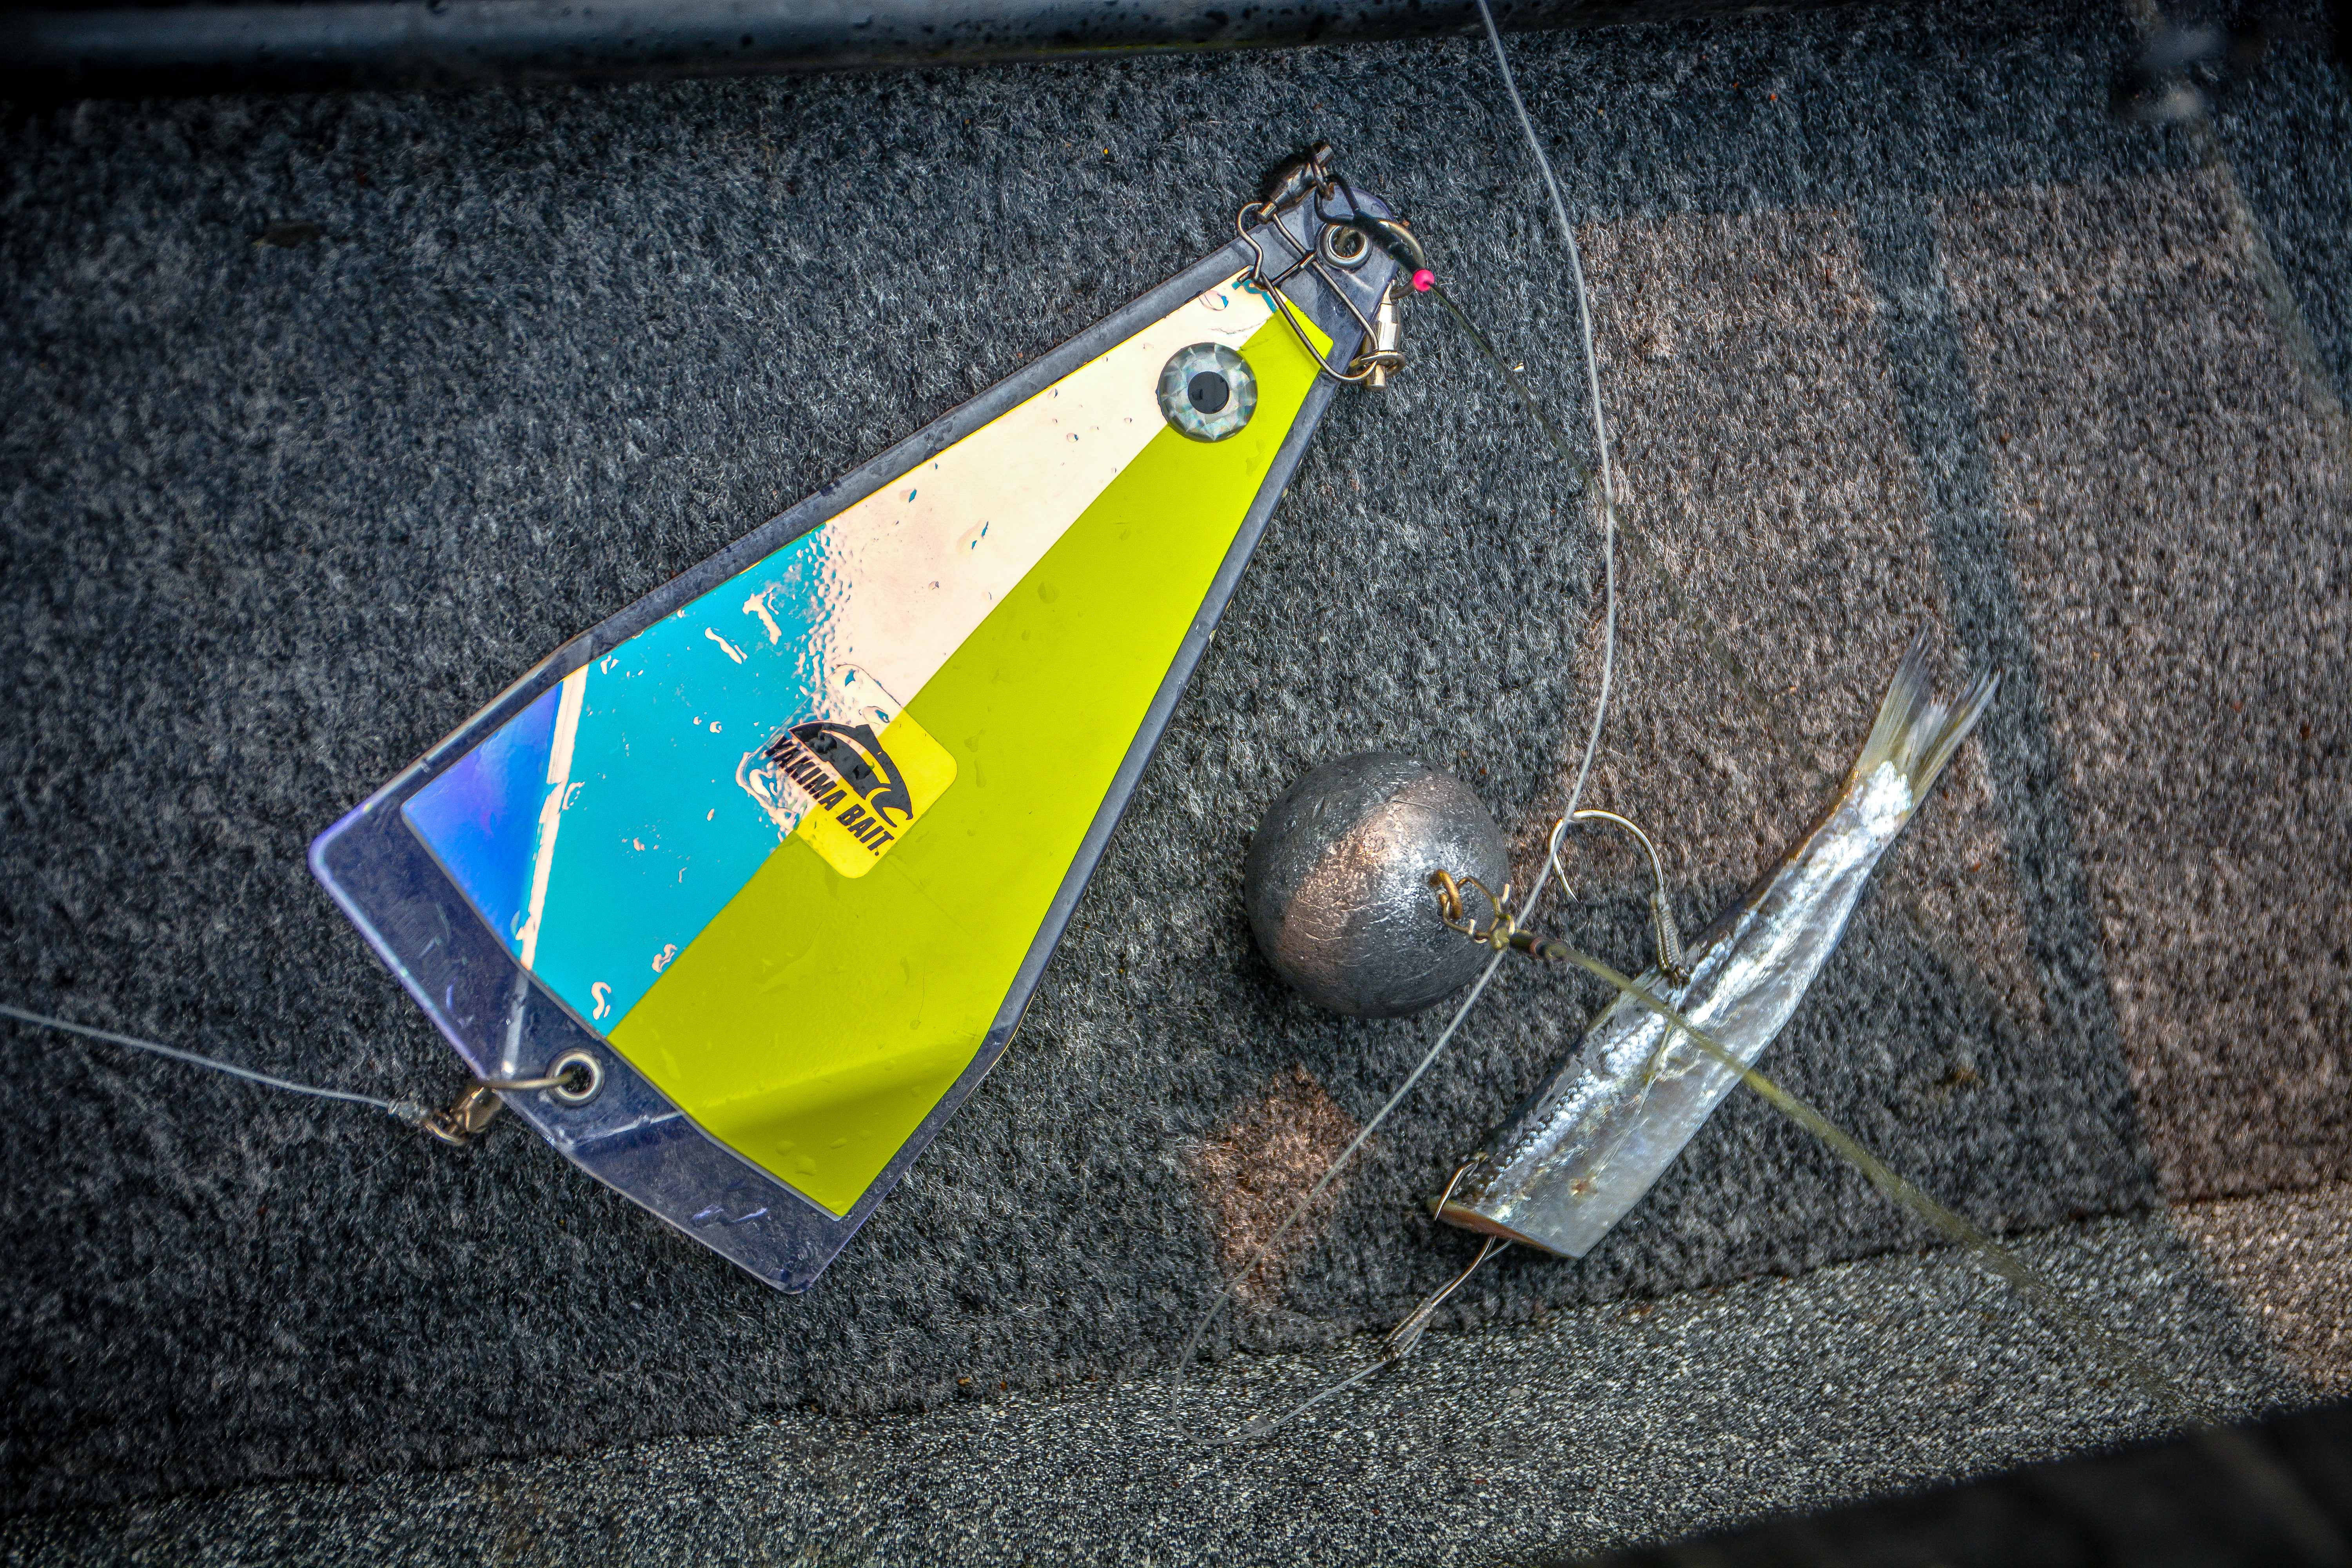
Those in the river often fish plug cut herring trailing thirty-six to forty-eight inches behind an in-line flasher. A dropper weight is added and the gear is deployed from a stout rod and drug along the bottom to salmon that are migrating upriver. This technique is used for both Spring and Fall salmon fishing and will catch both Chinook and Coho. The salt angler who uses downriggers can run the baits behind dodgers or flashers with a long leader. But the best part about using a downrigger and a herring is that you can run it bare. So when a salmon hits it’s just you and the fish. No extra drag from hardware.
If you don’t have downriggers and fish the salt then the herring is a great bait to mooch. It is a simple technique where you use a mooching weight and the two-hook snelled leader. Plug cut the brined herring and simply drop it down to where you are marking fish in the sonar. Then lift the rod upward and let if fall. Mooching rods are long with a sensitive tip but a very strong power rating. When you see a large school of herring on the fish finder then staying put and work the bait ball will often lead to a few salmon. But if you are not finding large amounts of bait then work points, ledges and kelp beds by “motor mooching”. This is simply keeping your boat motor gear engaged at idle and as your boat slowly moves along you mooch your baits.
At the end of the day don’t throw away those thawed baits that have been sitting in a brine. Instead keep them on rock salt and re-freeze them to be used later in the year as a herring wrap on your favorite plug. They also can be cut into pieces and added to a gob of eggs or tip a jig for chums while float fishing. You can also re-freeze them and use them for lingcod or add to the crab bait next summer.
Jason Brooks hails from North-Central Washington. The son of a fishing guide, Jason is an avid hunter, angler, outdoor photographer and published writer. He resides in Puyallup with his wife and two boys.
Comments
Why is this comment inappropriate?
Delete this comment? Provide reason.